Lab A: First Turtlebot4 Programming
Today's Lab
- Our first interactions with Turtlebot4! You'll keep your Turtlebot4 from running into walls and figure out how to have Turtlebot4 spin in circles.
Connecting to a Turtlebot4
You'll need to follow the instructions for connecting to a Turtlebot4 before beginning this exercise.
Coding Exercise #1: Turtlebot4 Spinning in Circles
For this exercise you'll work with one partner, where you and your partner will share one robot. Both you and your partner will individually complete both exercises (each of you should have a working solution on your computer). Even though you each will be working on your own solutions, feel free to collaborate with one another, talk through your code, and/or share your screen in order to help each other out.
Your goal in this exercise is to program your Turtlebot4 to perpetually spin in a circle. Let's first create a new ROS2 package called lab_a_spin_circles:
$ cd ~/intro_robo_ws/src/
$ ros2 pkg create --build-type ament_python --license Apache-2.0 lab_a_spin_circles
$ cd ~/intro_robo_ws/
$ colcon build --symlink-install --packages-select lab_a_spin_circles
$ source ~/intro_robo_ws/install/setup.bashcolcon build command above:
--symlink-install- This flag creates symbolic links, meaning that you don't have to re-build every time you edit a python file, only when you make more substantial changes to the ROS2 package (e.g., tosetup.py).--packages-select lab_a_spin_circles- This flag tells colcon to only build the specified package, rather than all packages in the workspace.
Every time you create a new ROS2 package, you'll want to fill out the following information in the automatically-generated files package.xml and setup.py:
-
package.xml<description><maintainer>- Add a new line after the <license>Apache-2.0</license> line and put in the necessary dependencies for this package:
<depend>rclpy</depend>
<depend>std_msgs</depend>
-
setup.py- description
- maintainer
- maintainer_email
Within the lab_a_spin_circles package, there will be a directory of the same name (lab_a_spin_circles). Within this directory, create a new python file called spin_in_circles.py. This is the Python file we'll use to program our robot to spin in circles.
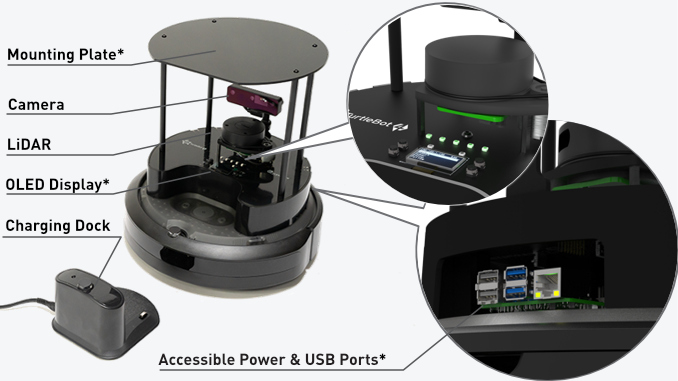
Before going any further, it's helpful to get familiarized with our friend, the Turtlebot4. You can see all of the components of the Turtlebot4 highlighted in the figure below.
In order to program the robot to spin in circles, you'll want to be controlling the two motors that are connected to the robot's two wheels. The relevant ROS2 topic you'll find useful is:
- cmd_vel - When you publish to this topic, you'll set the robot's velocity. The
linear.xdirection sets forward velocity andangular.zsets angular velocity.
- ros2 topic list
- ros2 topic info topic-name
- ros2 topic echo topic-name
- ros2 msg show message-type-name
Running Your Code
To run your code, you'll first need to establish a connection between you and the robot:
- Turn on the robot, wait for it to boot (it will play the "Chime" noise once it's completed the boot process, which usually takes 2.5 minutes). Ensure the robot's 5 LEDs are green (if they're not, follow the instructions on the Physical Turtlebots resource page to fix it).
- Tell your computer which robot you want to connect to:
$ set_robot_num [robot-num]
Then, you'll need to make sure that you have declared an entry point in setup.py for any scripts you want to run. For example, for the spin_in_circles.py script, you would add the following entry point in the entry_points section of setup.py:
entry_points={
    'console_scripts': [
        'spin-circles = lab_a_spin_circles.spin_in_circles:main',
    ]
}colcon build command and source the overlay:$ cd ~/intro_robo_ws
$ colcon build --symlink-install --packages-select lab_a_spin_circles
$ source ~/intro_robo_ws/install/setup.bashNow, you can run your code and see how it executes on the robot!
$ ros2 run lab_a_spin_circles spin-circlesOnce you finish, your robot should behave somewhat similar to what is pictured below:
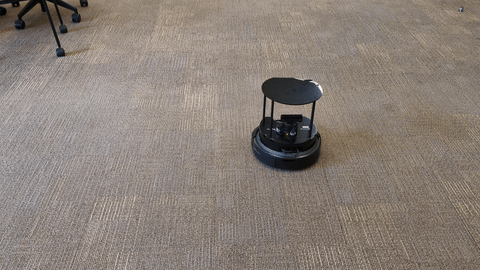
Capture a video of your robot spinning in circles. You'll need this for your Lab A submission on Canvas.
Once you and your group finish this coding exercise, please move onto the next exercise.
Coding Exercise #2: Turtlebot4 Stopping in Front of a Wall
To get started on this exercise, create a new ROS2 package inside the intro_robo_ws directory called
lab_a_stop_at_wall. You can use the same commands to create this ROS2 package as you did for
lab_a_spin_circles.
Your objective in this exercise is to move the robot forward and stop it just before it would collide with a wall. This will require positioning the robot in front of a wall and using the laser scan data from the robot's LiDAR (see robot diagram again, below) to make decisions about how to control the motors driving the two wheels of the robot.
When finding a wall for your robot, ensure that it is opaque (i.e. not a glass window). Remember, glass is transparent to the LiDAR.
The relevant ROS2 topics you'll find useful are:
- cmd_vel - When you publish to this topic, you'll set the robot's velocity. The
linear.xdirection sets forward velocity andangular.zsets angular velocity. - scan - The Turtlebot4 publishes its LiDAR sensor measurements to this topic of type LaserScan. The attribute that you'll find most useful is
ranges, a list of 1000+ numbers where each number corresponds to the distance to the closest obstacle from the LiDAR at various angles. You'll need to test (e.g., use print statements) to determine which entries within therangeslist correspond with what is directly in front of the robot.
Use the same process as in exercise #1 to create an executable python script (e.g., stop_at_wall.py)
within the lab_a_stop_at_wall package. Remember to declare an entry point for your script in
setup.py and re-build your package.
Success looks like what you can see in the following gif of a Turtlebot3 robot (the prior version of the Turtlebot) where the robot stops just before it would collide with the wall:
Capture a video of your robot stopping in front of a wall. You'll need this for your Lab A submission on Canvas.
If your group finishes both coding exercises #1 and #2, you can either leave or spend time working on the Warmup Project.
Lab A Deliverables
For your Lab A Deliverables, submit the following via Canvas/Gradescope by 2:00pm on Thursday, October 2nd:
- Video of your robot spinning in circles
- Video of your robot stopping in front of a wall