Working with Physical Turtlebots
These are instructions for running ROS code on a physical Turtlebot4 in the John Crerar Library.
Handy Links
- Turtlebot Hardware Status Spreadsheet: This spreadsheet contains the current hardware status of the Turtlebots and OpenManipulator arms. If any of the class hardware is not working or acting funny, please make a note of it in this spreadsheet.
Overview
Each Turtlebot4 has two main components (1) an iRobot Create base and (2) a RaspberryPi. The RaspberryPi is connected to and controls the robot's sensors and arm and is the main interface between the user PC and the Create base. We have configured the Turtlebot4 robots with the Discovery Server network protocol.
Connecting to Turtlebot4
1. Turn On the Robot and Wait for Boot Completion
To start the robot boot process, pick up the Turtlebot4 robot by its base and place it on a charger. The robot should power on automatically. WAIT for the robot to finish its boot process before trying to connect - it should take about 2.5 minutes and the robot will make a "chime" noise once the boot process is complete.
2. WiFi Network Connection for Your PC
You will need to ensure your computer is connected to the correct wifi network:
- If you are using NoMachine to connect with a virtual CSIL5 machine: You can be connected with any available wireless network. We recommend connecting to
eduroamfor best performance. - If you are using any other computer setup (ROS2 on Mac/Windows, Ubuntu 22.04 partition/OS, VirtualBox VM):
Connect to the
intro_robowifi network (ask teaching team for the network password).
3. Environment Variable Setup
Next, you'll have to setup some environment variables to establish communication between your PC and the specific robot you wish to control: ROS_DOMAIN_ID, ROS_DISCOVERY_SERVER, and ROS_LOCALHOST_ONLY.
-
Robot number: Specify which robot you want to connect to:
The$ set_robot_num [robot-num]set_robot_numbash function is one that we wrote to automatically set theROS_DISCOVERY_SERVERto the IP address of the desired robot and to setROS_DOMAIN_IDto the number of the robot.Note: A few things to keep in mind with set_robot_num:- Checking current robot ID: If you want to check the current robot number you have saved in your environment variable settings you can run:
$ echo $ROS_DOMAIN_ID - Saved default: Your computer will save the last robot number you connected to, so be careful to check and reset the robot number each time you start working with a new robot. If you're curious, you can find the currently saved settings in
~/intro_robo_ws/src/intro_robo/intro_robo_utils/discover_server_env_variables.shwhich is sourced in your.bashrcfile.
- Checking current robot ID: If you want to check the current robot number you have saved in your environment variable settings you can run:
-
ROS_LOCALHOST_ONLY: If you're working with Gazebo and the simulated Turtlebot4, you'll want to set
ROS_LOCALHOST_ONLY=1, otherwise, if you're using the physical Turtlebot4 robot, you'll wantROS_LOCALHOST_ONLY=0. You can change this variable by editing your.bashrcfile:
After editing it to set$ nano ~/.bashrcROS_LOCALHOST_ONLYto your desired value, source the.bashrcso your changes take effect:$ source ~/.bashrc
4. Check Turtlebot4 Create Base Connectivity
In order to work properly, your Turtlebot4 it needs to have established a connection between its RaspberryPi and Create base. To check to make sure everything is working correctly, check the 5 LEDs on the robot. All 5 LEDs should be green. If the COMM and BATT lights are off, you'll need to reboot the RaspberryPi to properly establish a connection with the Create base.
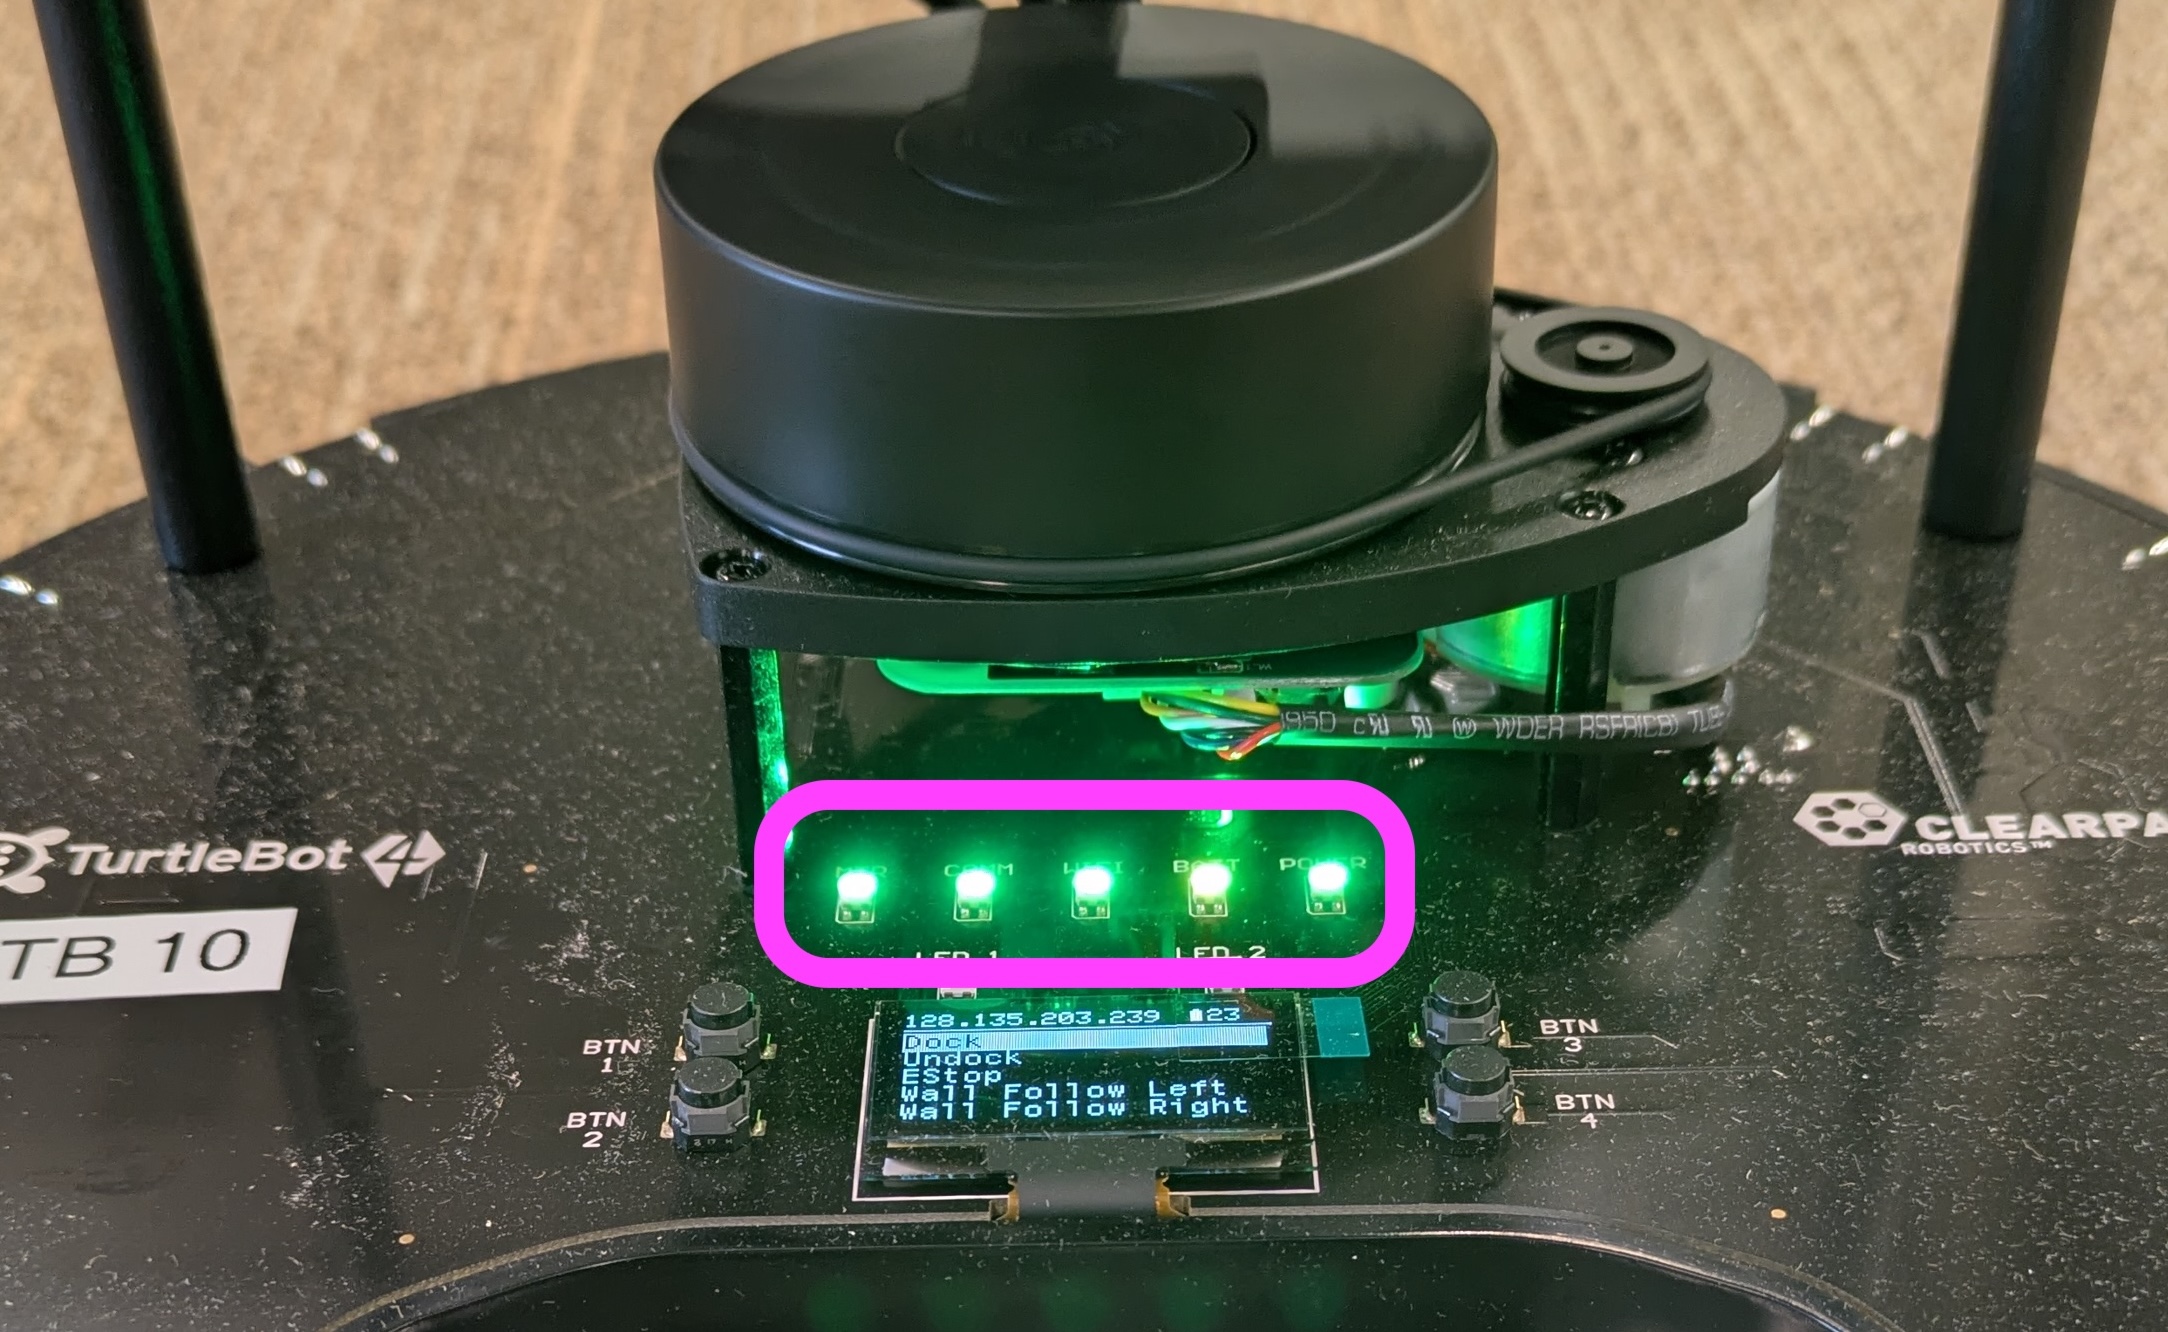
If all 5 LEDs are green, you're all set and can continue to the next step!
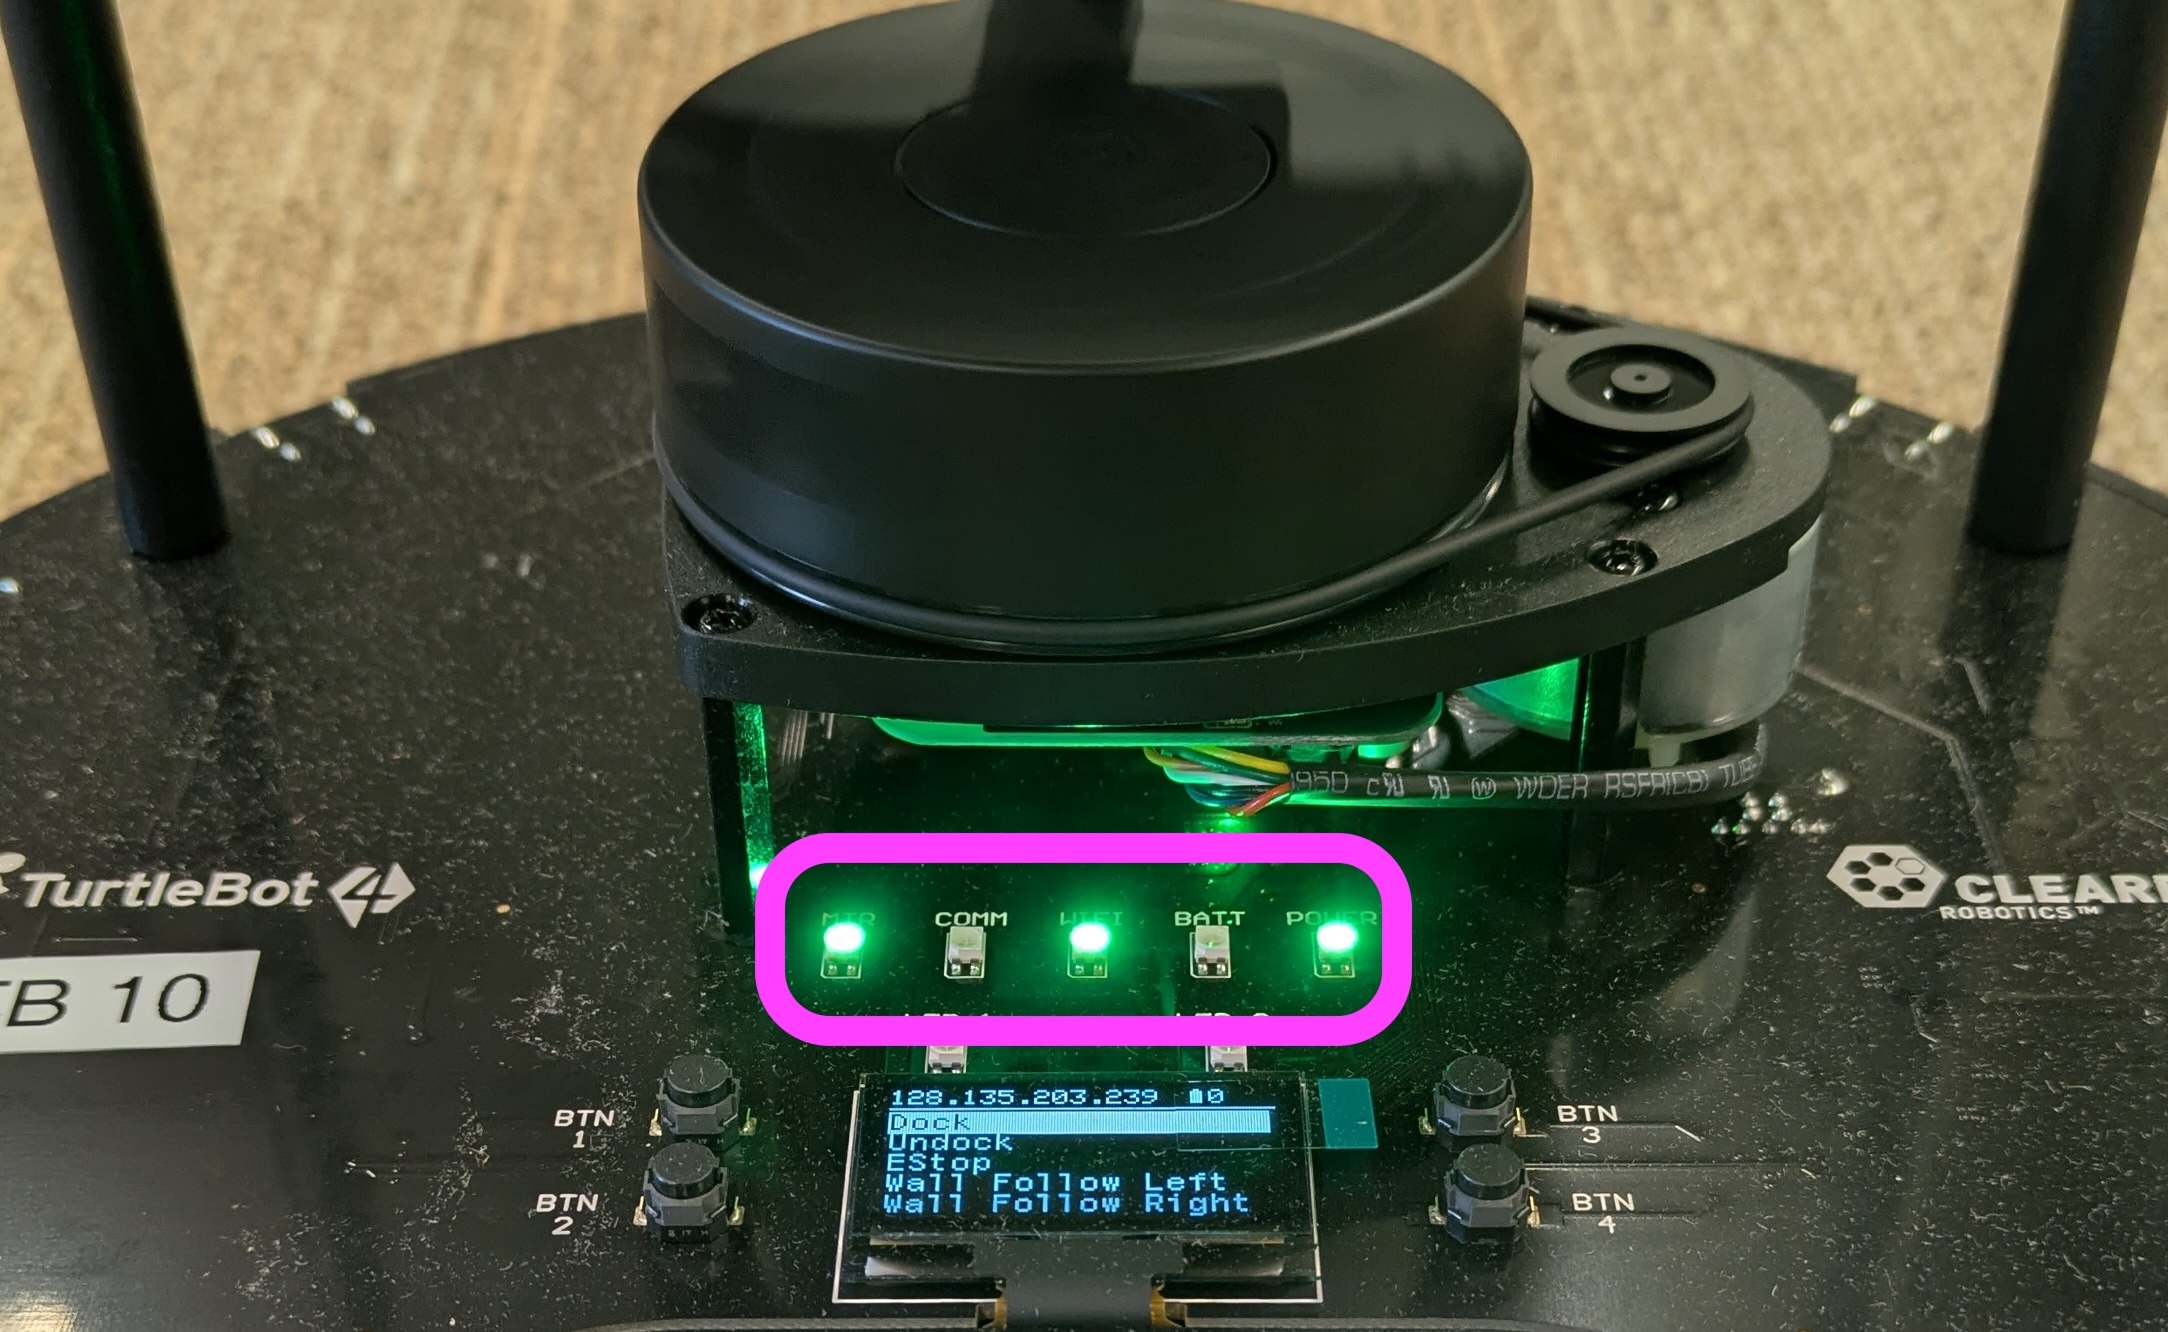
If the COMM and BATT LEDs are off, you'll need to reboot the RaspberryPi to re-establish a connection with the Create base. First SSH into the robot (password: turtlebot4)
$ ssh ubuntu@$ROBOT_IP$ sudo reboot5. Test Your Connection
There are a few different ways to test your computer's connection to your specific Turtlebot4. Here are a few options:
-
List ROS2 topics: Run ros2 topic list in your terminal once the robot is fully turned on (you hear the Chime noise and all 5 green LEDs are on). You should see a long list of ROS2 topics all starting with
/tb11, for example, if you're trying to connect to Turtlebot 11. -
Publish movement commands via the terminal: You can publish ROS2 messages directly to the terminal using the command below. This command will move the robot forward, so ensure the robot is off the charger. Remember to replace the robot number in the ROS2 topic name (
tb11below) with the one that you're currently working with:$ ros2 topic pub /tb11/cmd_vel geometry_msgs/msg/Twist \ "linear: x: 1.0 y: 0.0 z: 0.0 angular: x: 0.0 y: 0.0 z: 0.0"
Teleoperation of Turtlebot4
There are two main ways to teleoperate the Turtlebot4: (1) using your keyboard or (2) using the remote control that comes with the robot.
Using Your Keyboard
You can teleoperate the robot using your keyboard by running (remembering to replace the turtlebot number with the number of your robot):
$ ros2 run teleop_twist_keyboard teleop_twist_keyboard --ros-args -r __ns:=/tb04Using the Remote Control
The Turtlebot4 comes with a handy remote control that you can use to drive the robot around.

In order to use it, you'll need to SSH into the robot and run a command that remaps the joystick input on the remote control to publish to the robot's ROS2 topics. Make sure that you replace the turtlebot number with the number of your robot in BOTH places.
$ ssh ubuntu@$ROBOT_IP
$ ros2 run teleop_twist_joy teleop_node \
  --ros-args \
  -r joy:=/tb11/joy \
  -r cmd_vel:=/tb11/cmd_vel \
  -p axis_linear.x:=1 \
  -p axis_angular.yaw:=0 \
  -p scale_linear.x:=0.5 \
  -p scale_angular.yaw:=1.5 \
  -p deadzone:=0.05 \
-p require_enable_button:=falseWe've found that the remote control, while very intuitive to control the robot, tends to disconnect often. To reconnect, just press the home button and wait for the blinking light blue light to turn dark blue. It might take a few tries to reconnect.
Operating the OpenManipulatorX Arm

Unlike the Turtlebot4, the OpenManipulatorX arm does not automatically start publishing and subscribing to ROS2 topics as soon as it turns on. You'll have to run the bringup code for the arm and start up MoveIt! every time you want to work with it. Follow the steps below:
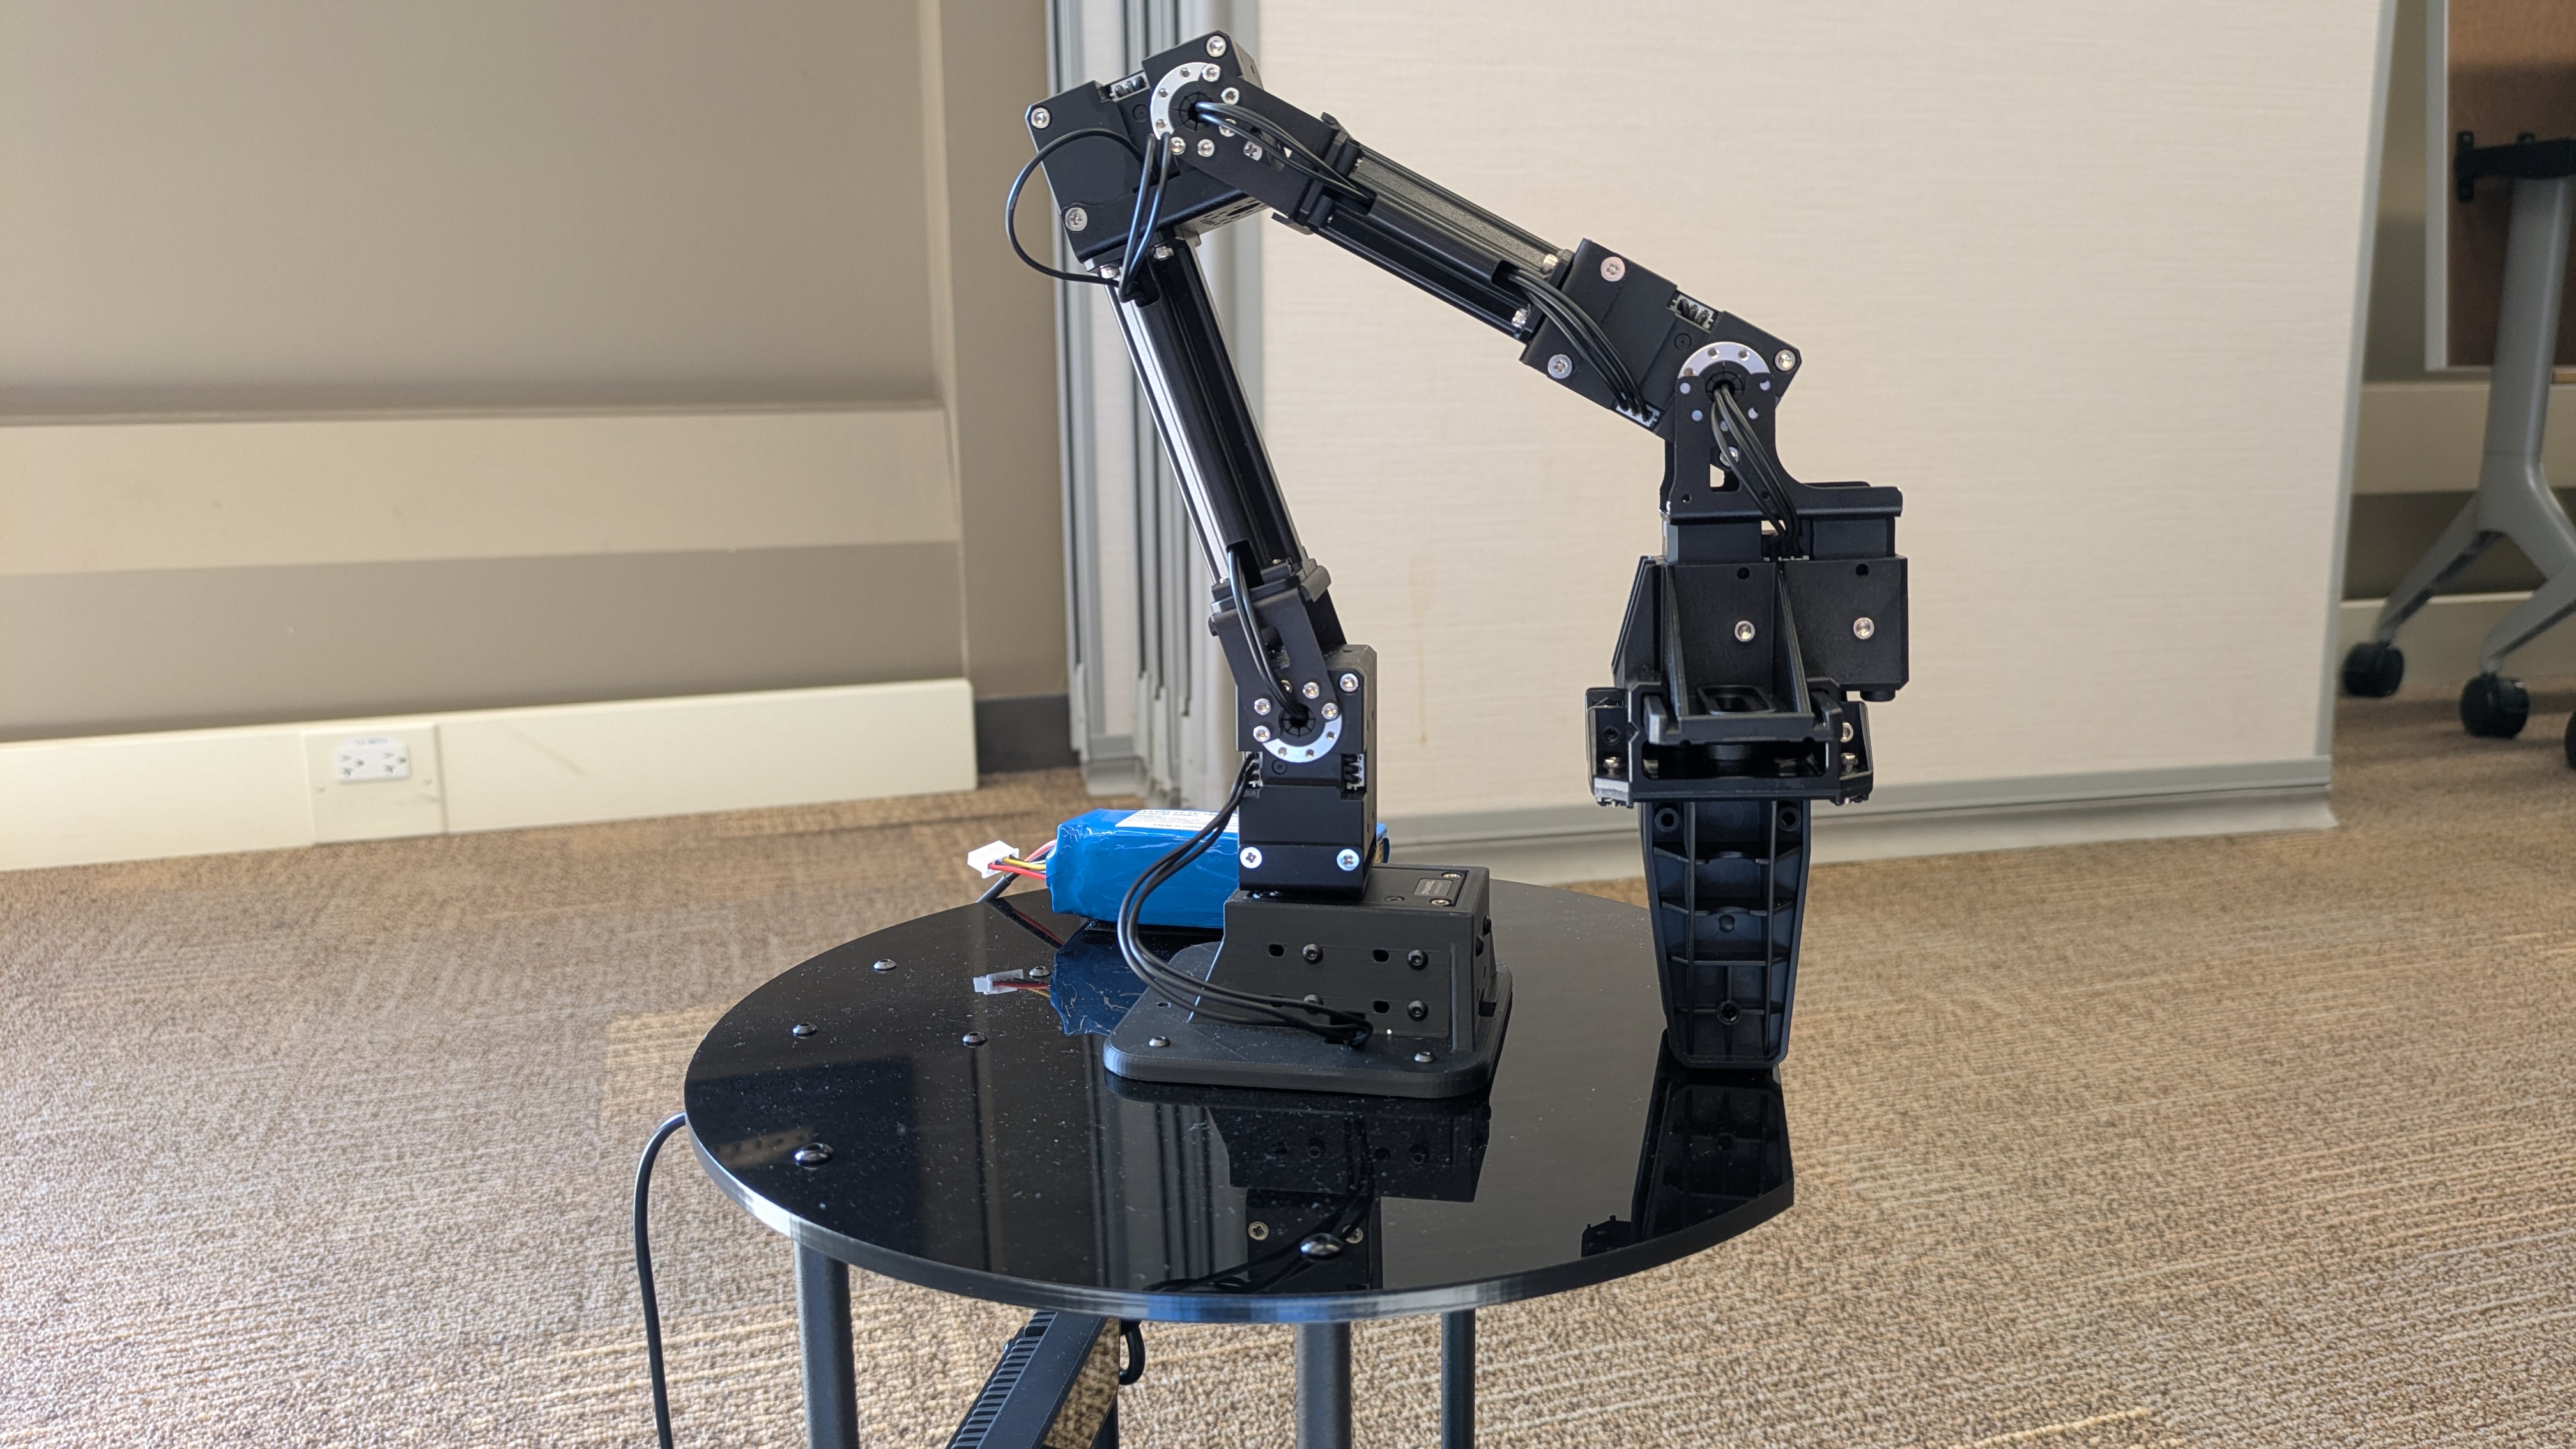
- Check Battery: Ensure that a fully charged battery is plugged into the U2D2 board on the top plate of the robot.
-
Position the Arm: Position the arm as shown in the picture below to enable the arm to initialize properly. If you fail to do this, you may find that any movement command you send to the arm will fail.
-
[Terminal #1] SSH into the robot (password:
turtlebot4), check USB port number, and run bringup:
After running sudo dmesg | grep ttyUSB look for which USB port the$ set_robot_num [robot_num] $ ssh ubuntu@$ROBOT_IP $ sudo dmesg | grep ttyUSBFTDI USB Serial Deviceis connected to, it should be eitherttyUSB0orttyUSB1. Now run the bringup command for the arm by specifying the USB port you identified in the prior step.$ bringup_arm port_name:=/dev/ttyUSB1Note:bringup_armis an alias for the commandros2 launch open_manipulator_x_bringup hardware.launch.py. -
[Terminal #2] SSH into the robot and start MoveIt!: In a separate second terminal, ssh into the robot and start MoveIt!.
$ ssh ubuntu@$ROBOT_IP $ start_moveitNote:start_moveitis an alias for the commandros2 launch open_manipulator_x_moveit_config move_group.launch.py. -
[Terminal #3] Control the robot from your PC: You have several options here:
-
For the OpenManipulatorX GUI:
$ ros2 launch open_manipulator_x_gui open_manipulator_x_gui.launch.py -
For running code:
$ ros2 run [package-name] [file-name]
-
For the OpenManipulatorX GUI:
OpenManipulatorX Arm Troubleshooting
If the OpenManipulatorX arm isn't working, here are some troubleshooting steps we'd recommend trying:
- Check Turtlebot4 hardware status spreadsheet: Is the robot listed as broken? If so, use a different robot.
- Debug terminal tabs: Have you checked each terminal window (bringup arm, moveit, GUI/code) to see where the error seems to be coming from?
ROS_DOMAIN_ID/ robot number: Have you checked theROS_DOMAIN_IDin each terminal window (e.g., echo $ROS_DOMAIN_ID?) All terminals should have the sameROS_DOMAIN_ID.- Proper sourcing: Has you recently run
colcon build? Might you have forgotten to run either source ~/.bashrc or source ~/intro_robo_ws/install/setup.bash in each terminal after building? sudo rebootif all else fails: If the bringup and moveit are doing ok, but not the GUI/code, trysudo rebootfor the robot.$ ssh ubuntu@$ROBOT_IP $ sudo reboot