Lab 3: Hello Misty
Learning Goals
- Students will learn how to connect to the Misty robot and program robot behaviors from their laptop using Python and the Misty Python SDK.
- Students will gain experience programming the Misty robot's verbal and nonverbal behaviors by writing a program where the robot introduces itself to a new user.
To Complete Before Lab
Preparing Your Development Environment
To allow you to start programming Misty right away, we are asking all of you to prepare your software development environment in advance of class. Please follow the steps below.
-
Python version: Ensure that your python version is >= 3.10. You can check your python version by running in your terminal:
python3 --version. If your version is < 3.10, you can update your python version by downloading the most recent version of python from python.org. -
Create HRI course directory: Create a directory that you plan to put all of your Misty programming for this course. We recommend naming this folder something like
hri_course_misty_programming. -
Create virtual environment and install dependencies:
cdinto the directory you created in the previous step and within it, set up a virtual environment by following the steps in this Install packages in a virtual environment using pip and venv guide. Once you get to the "Install packages using pip" section, install the following dependencies:pip install requests pip install --force-reinstall -v websocket-client==0.57.0 pip install yapf pip install google-cloud-storage pip install -U google-generativeai pip install python-dotenv pip install --force-reinstall -v urllib3==1.26.20 pip install Pillow pip install deepgram-sdk pip install ffmpeg-python pip install openai pip install mutagen -
Clone Misty's Python-SDK:
cdinto your HRI course directory directory (hri_course_misty_programming) and run:git clone https://github.com/MistyCommunity/Python-SDK.git -
Create a new directory for Lab 3 and add starter code: Within your HRI course directory (
hri_course_misty_programming), either:-
Use our template repo: Create a new git repository by using our template repo lab_3_misty_introduction. To do this, click on the "use this template" button and cloning your new repository into your HRI course directory (
hri_course_misty_programming). -
Manually copy and paste starter code: To manually copy and paste the starter code, create a new directory for lab 3 (e.g.,
lab_3_misty_introduction) and create a new file within this directory calledmisty_introduction.py. Copy and paste the code in misty_introduction.py from our template repo into this file.
-
Use our template repo: Create a new git repository by using our template repo lab_3_misty_introduction. To do this, click on the "use this template" button and cloning your new repository into your HRI course directory (
Working in Groups
During this lab, you will work at a table with 3 students and 1 Misty robot. Each individual within the group is expected to write their own code and implement their own robot introduction. While each student is completing their own work on the robot, we highly encourage your groups to collaborate with one another by sharing ideas and helping each other debug your code.
You will work with this same group for all of the robot programming labs (Labs 3-5). Group assignments can be found on the tables in CSIL 1/2 when you arrive.
Lab 3 Deliverables & Submission
Your work on Lab 3 will involve programming the Misty robot to introduce itself using our starter code as a starting point. Your are expected to upload the following to Canvas after you have completed the lab:
- A video of Misty performing your introduction
- Your source code:
misty_introduction.py
To receive credit for this lab, you will need to submit your video and code to Canvas by Friday, April 11 at 6:00pm.
Connecting to Misty
Follow these instructions to connect to Misty. I used the Misty II documentation to create these instructions.
Grabbing Misty from the Lockers
When you want to work with Misty outside of lab time, please refer to this Misty Locker spreadsheet (that is only shared with members of the class) to get the locker number and code for your Misty robot. Please only use the Misty robot assigned to your course project group. You're welcome to come and program your Misty robot anytime during CSIL hours for either lab assignments or the final project.
If you have any issues with your Misty robot or strange behavior, please reach out to our "Robot" TA Lauren Wright at llwright@uchicago.edu.
Turning Misty On
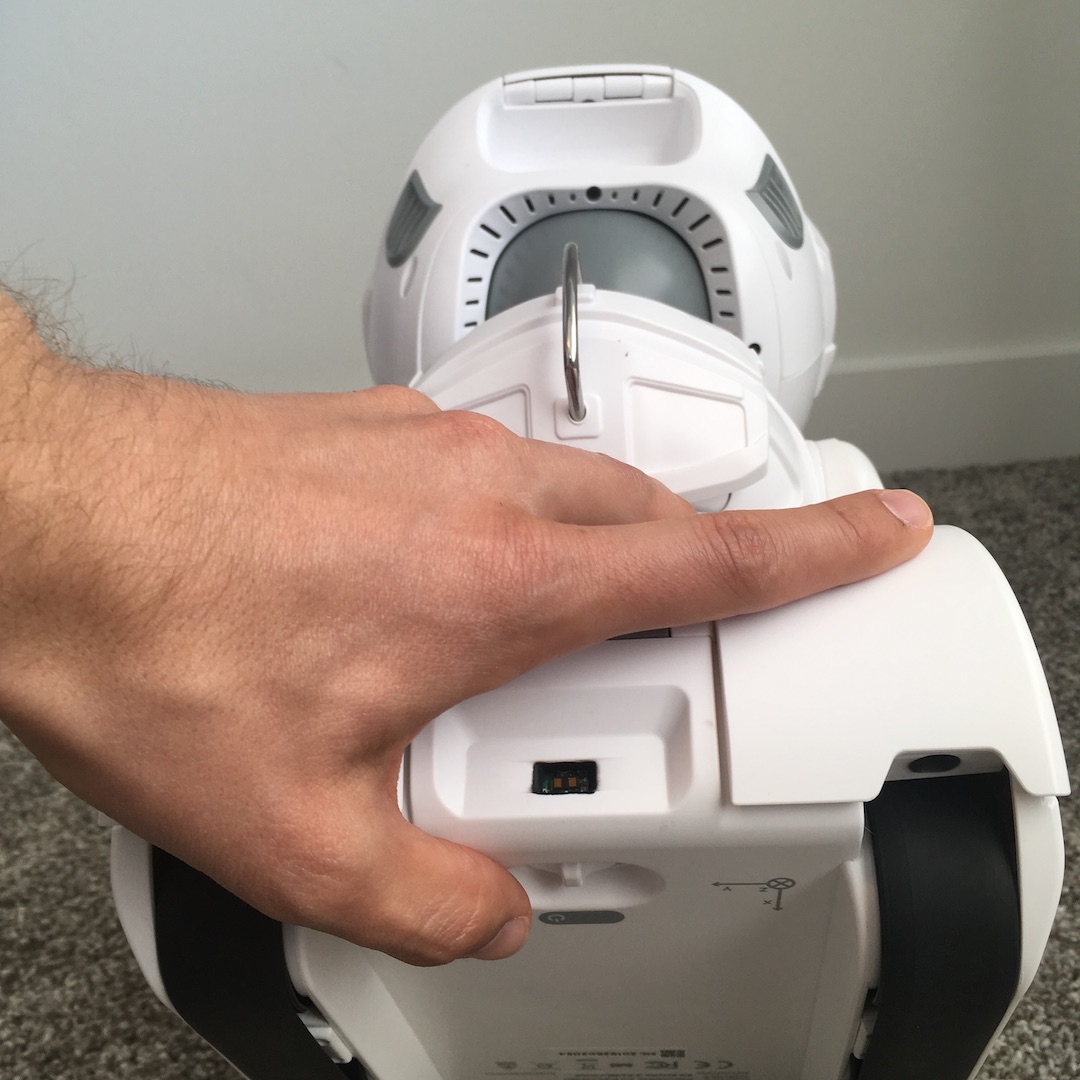
Toggle the power switch on Misty's base (located between the treads at the back of the robot). The robot will take a little bit to fully boot up. The eyes will be fully open once Misty has finished the booting process. To turn Misty off, toggle this same switch.
Connecting to Wi-Fi
In order to program Misty, both your computer and the robot will need to be connected to the same Wi-Fi network. For this class, we'll be using the intro-robo Wi-Fi network in CSIL 1/2. Please ask the teaching team to provide you with the password.
Follow these instructions to connect Misty to Bluetooth and Wi-Fi. To connect to Misty, you'll need to have either an iPhone or Apple tablet download the Misty app from the Apple App store and use this app to connect Misty to the intro-robo Wi-Fi network.
Misty Studio
Open up the Misty Studio by entering http://{MISTY-IP-ADDRESS}/ in a browser window. Play around with the Misty Studio! You can have Misty speak, move, change its facial expression and more! Misty Studio should look like the following image:

Misty Python API
In this class, we recommend that you use the Misty Python API to program Misty. For today's class, the pages that you'll likely find most useful are:
Labs 3-5 Context
In our robot programming labs (labs 3-5), you will be programming the Misty robot to act as a facilitator of a positive psychology exercise called the "Three Good Things." This exercise is a well-known positive psychology intervention that has been shown to improve overall mental health and well-being. In this exercise, both the robot and the participant will take turns sharing three things that they are grateful for that have happened to them in the past week. We will be programming a different part of this interaction in the three labs:
- Lab 3: You will program the robot to introduce itself to the participant as well as the "Three Good Things" exercise the robot will be facilitating.
- Lab 4: You will create a Wizard-of-Oz GUI interface for a human experimenter to control the robot during this interaction, allowing the robot to express both pre-scripted utterances (e.g., introduction, things it is grateful for) and responsive utterances and responses with a text box and other buttons.
- Lab 5: You will leverage an LLM to allow the robot to have a flexible and responsive conversation with the participant through the "Three Good Things" exercise.
Lab 3 Exercise: Robot Introduction
Your Goal
Your goal for this lab is to program a Misty to introduce itself to a new human participant and also introduce the "Three Good Things" exercise (see above). Your introduction needs to make use of all of the following components:
- Verbal speech
- Head movement(s)
- Arm movement(s)
- Tread/wheel movement(s)
- LED change(s)
- Facial expression change(s)
- Playing audio expression(s)
- While most of the instructions for the other Misty API functions are easier to find, those for playing audio expressions is less so. There is information on this page about the
play_audiofunction that you can use to figure out how to play these audio expressions.
- While most of the instructions for the other Misty API functions are easier to find, those for playing audio expressions is less so. There is information on this page about the
The following video is a simple example of a Misty introduction that uses all of the components listed above:
Extra Challenge
If you find yourself wanting to take on an extra challenge, you can try to incorporate the Misty events to allow the user to start the Misty's introduction only when it's bump sensor is pressed. We recommend checking out the following resources to implement this:
Common Errors Faced by Students Trying to Program Misty & Some Solutions
HTTP Connection Errors
If you face a HTTP connection like the one depicted below, this usually means that your computer is blocking the HTTP connection between you and the robot, preventing you from sending commands to the robot:
requests.exceptions.ConnectionError: HTTPConnectionPool(host='192.168.0.182', port=80): Max retries exceeded with url: /api/tts/speak (Caused by NewConnectionError(': Failed to establish a new connection: [Errno 65] No route to host')) Here's how to address this error:
- If you're running your code from the terminal in VS code on a Mac:
- Open System Settings
- Go to Privacy & Security
- Scroll down and click Local Network
- If Visual Studio Code is listed but unchecked, check the box to allow network access
- If VS Code is not listed, try running your code again and then check this menu - macOS often shows a prompt after first use
- After making changes, restart Visual Studio Code and try again
- If you're running your code from the terminal on a Mac:
- Open System Settings
- Go to Network > Firewall
- Click Options... (you may need to enter your password)
- Check whether Terminal or Python is listed there
- If it is, make sure it's set to "Allow incoming connections"
- If it's not listed, you can temporarily turn off the firewall to test the connection by toggling the Firewall switch to Off
- Try running your code again
- If it works with the firewall off, you can add a permanent rule to allow Python or Terminal
Module Not Found Errors
Even after you run pip install for the necessary packages, you might still see errors when running your Python file:
ModuleNotFoundError: No module named 'tkinter'
ModuleNotFoundError: No module named 'requests'
ModuleNotFoundError: No module named 'websocket'
ModuleNotFoundError: No module named 'PIL'
This usually happens because the packages were installed using Homebrew's version of Python, which can cause conflicts. Here's how you can fix it:
- Check which Python you're using
- Type: which python3
- If you see
/opt/homebrew/bin/python3, that means you're using Homebrew's Python - Ideally, your Python should be installed from the official website or through pyenv, and located at:
/usr/local/bin/python3or/Library/Frameworks/Python.framework/Versions/3.x/bin/python3
- Check where your package was installed
- For example, to check the requests package, type: pip3 show requests
- Look at the Location: line. If it says something like:
/opt/homebrew/lib/python3.10/site-packagesthen the package was installed to Homebrew's Python and may not be accessible from your current Python interpreter
- Uninstall the package from the Homebrew location
- To uninstall, type: /opt/homebrew/bin/pip3 uninstall PACKAGE_NAME , where your package name will be the desired package (e.g.,
requests,websocket, etc.)
- First, check where your pip is located by typing: which pip3
- If it still points to
/opt/homebrew/..., you can directly run: /Library/Frameworks/Python.framework/Versions/3.10/bin/pip3 install --user PACKAGE_NAME - Or just force the install to your user directory with: pip3 install --user PACKAGE_NAME
- Type: pip3 show PACKAGE_NAME
- Check that the Location: line shows something like:
/Users/yourname/Library/Python/3.10/lib/python/site-packages