BACKGROUND:
Like
all programming problems, learning a new technology is not
an exercise in reading but rather an exercise in thinking
and typing. This lab is designed to give you
hands-on experience in some fundamental skills involved in
Docker containerization. You will generally find the
References section below helpful in addition to the required
and recommended reading. When we talk about "Docker",
we are talking specifically about the Stable Community
Edition of Docker, which is the version we will be using in
this class. The Stable Community Edition provides the
basic container engine and built-in orchestration,
networking, and security.
In this lab problem, you will distribute your blockchain
across multiple Docker containers and have them all
inter-communicate in terms of broadcasting transactions and
mining blocks.
WHAT YOU NEED TO DO:
First, let's just pause for a moment and
understand where you are and where you are going. Right
now, through Lab 8 you have a program (or two) that (a)
generates new transactions and adds them to your blockchain
and (b) mines them. All you're going to do here is
distribute this program so that the same program runs on
multiple Docker containers ("full node peers"), so that
multiple transactions are coming from multiple containers, and
multiple containers are mining the transactions they hear
about.
Make sure you have read and understood the implications of
Chapter 8, The Bitcoin Network, of Antonopoulos.
As usual, anything not specifically prescribed or proscribed
in the following instructions is left to your discretion (aka
creative license) as to exactly how to implement.
Details:
The first thing you will need to decide is what distributed
communication mechanism you are going to use. Of course,
you can choose to simply work with raw sockets. This
will prove engaging but also challenging, as you may have to
worry about endianness, structural boundaries, string
termination, communication faults, and all sorts of other
things that may come into play. That said, communicating
over raw sockets requires nothing other than your programming
language and its libraries.
The other options include Java RMI, Google gRPC, Windows
Communication Foundation WCF/.NET, or any other mechanism you
wish (you may NOT choose a shared file system such as NFS,
etc., where you only really have a "single" blockchain that
every peer jointly "sees") that will allow for the exchange of
serialized "string" of data over the network between
containers. The exact mechanism of data sharing is
entirely up to you, but in general, you will need to be able
to serialize your transactions into some form of "byte
stream", and transmit that stream between
containers. Using a mechanism such as gRPC
or RMI will go a long way towards simplifying the handling of
the serialization of your data. Note your mileage may
vary when trying to serialize an actual Transaction object as
opposed to a simple string. This will be left to you to
ponder. That said, the only thing you will really need
to transfer are Transactions and Blocks and a few handshaking
structures.
Vocabulary: When we speak of a "Node" below, we
mean a Docker container. When we speak of a "Full Node",
we mean a docker container running an
instance of your Blockchain Mining Software you produced
for Lab 8, now newly distributed (as described below)
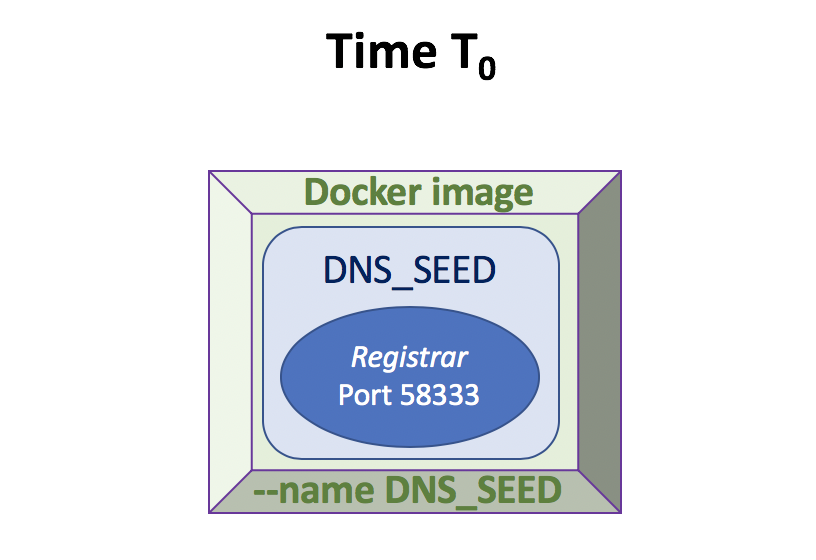
STEP 1 (Time T0):
Figure out what default port your bitcoin
network will establish initial communication over, ie, the
handshake port. You can use any ephemeral PORT, such as
58333 (bitcoin's default for Mainnet is 8333), or 12345,
etc. Your choice.
In one docker container, run a docker container whose "--name"
is "DNS_SEED", which will contain a program (Registrar)
which will listen on the ephemeral PORT you have chosen (e.g.,
58333, 12345, etc.), i.e., whose only job is to listen for
incoming connections (via whatever technology you are using
for network connections--raw sockets, RMI, WCF, gRPC,
etc.). For your docker image,
you are free to chose any docker image base that makes sense
to you, an ubuntu-based image is always a good bet.
STEP 2 (Time T1):
Each Full Node runs
in a docker container that is linked to the DNS_SEED
node in its docker run command (--link DNS_SEED).
The Registrar
program running in the DNS_SEED node does not actually have to
be running your blockchain mining software (a Full Node)...it
can be a simple network server (running RMI, gRPC,
WCF, raw socket) whose job it is to listen (on your ephemeral
PORT) for incoming connections and to return a list of {0...1}
"Full Nodes" on your coin network that have already
registered with the Registrar
program running on the DNS_SEED node. Note that the
first Full Node that registers (at time T1) will
receive null/0 nodes back from the DNS_SEED; however, its own
IP address will have been registered with the DNS_SEED.
You can think of the DNS_SEED node as acting as if it is a DNS
service. A Full Node (such as Node A) as we are
describing it is a distributed version of your
blockchain mining software you developed for Lab 8.
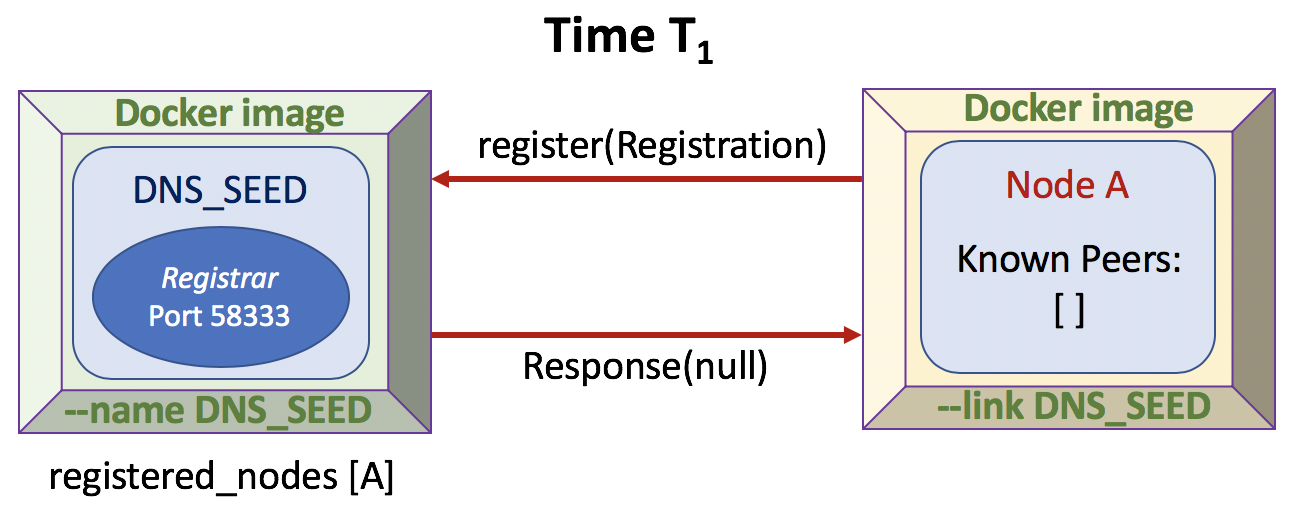
The first network call a newly-launched Full Node makes is a
call to the DNS_SEED's register()
function/method. The Full Node initializes
and sends (via the register() function) a serialized
structure/object [Registration] that contains the following
information:
struct/class Registration {
nVersion: The version of your mining software,
defaults for this Lab to 1.
nTime: The current time on the joining node
addrMe: The IP address of the joining node (e.g.,
"172.17.0.3" on your docker subnet)
}
Upon receipt, the DNS_SEED
records this information in a list, especially noting the IP
address of the registering Full Node in an internal
datastore (can be non-persistent, i.e., an in-memory list or
an actual database (e.g., MySQL, SQLExpress, etc., ... your
choice).
Remember that it is the job of the Registrar
to return a list of zero or one nodes ({0...1} "Full Nodes") that have previously
registered with it (the Registrar always
returns the latest registered node in its list or null/0 if it
has no nodes in its list). In our example, as of T1,
this is the very first Full Node registering with the
DNS_SEED, so the Registrar
running on the DNS_SEED will return zero or a null list (your
call on what that means) indicating that this registering node
is the first node to register.
After a Full Node (let's call
this Node A...you can consider it anything you wish)
first communicates with the DNS_SEED node and is registered,
each Full Node launches its distributed blockchain mining
server which begins to patiently listen for network calls
to its handshake() function/method (explained below).
STEP 3 (Time T2):
As time goes by, a new Full Node (let's call
this Node B) will run in a new docker container (again, always
linked to DNS_SEED). This new Full Node will do the same
thing as the previous Full Node: it will first register
(Step 1
in the drawing) with the DNS_SEED server (as
described above).
Once the newly-launched
Full Node has registered (Step 1
in the drawing) with the Registrar running in
the DNS_SEED (in our example this is Node "B"), if the node
gets a non-null response from the DNS_SEED (which in this
example it would, because the Registrar running on DNS_SEED
would have returned the IP address for Node A, its
last-registered node), the new Full Node ("B") will then
send a handshake() message (i.e., call the handshake()
function/method) on Node A's IP address it received back
from the Registrar
running in the DNS_SEED (Step 2 in our drawing),
seeking to communicate with that IP address whose server
(distributed blockchain mining software) is listening on
port (say) 58333. The handshake() function/method
takes in a Handshake class/structure from the calling peer
that resembles the Registration structure/class described
above, viz.:
struct/class Handshake {
nVersion: The version of your mining software,
defaults for this lab to 1.
nTime: The current time on the calling node
addrMe: The IP address of the calling node (e.g.,
"172.17.0.5" on the docker subnet)
bestHeight: The height of the blockchain tip as this
node knows it (can be the height of the genesis block)
}
Note the addition of the "bestHeight" field, which is the
height of the tip of Node B's blockchain (can be 0 if it
only has the genesis block). On receipt of a
handshake() call, the receiving Full Node ("A") will record
the IP address of the caller (Handshake.addrMe which will be
Node B's IP address) in a list of its known peers
(your call as to that form/structure). The list of known
peers is simply a list of IP addresses a Full Node
maintains of other Full Nodes that have "shook
hands" with it, i.e., called its handshake() method and
provided their IP address via Handshake.addrMe.
In returning from the handshake() call, the receiving Full
Node (the node whose Handshake() function was called, in
this case, Node "A") will return to the calling node ("B") a
list of all the nodes that it knows about, i.e.,
it's list of known peers, (at this time, that list
will contain only the IP of node "B", because Node A does
not know of any other nodes other than the
handshaking node "B"). We will leave it to you to
determine the structure of the returned list of known
peers. Node B will recognize its own IP returned
from node A's list of known peers, and will not act further
on it's own IP address.
STEP 4 (Time T3):
Node A now has a single known peer: Node
B. As time goes by, a new Full
Node (let's call this Node C) will run in a new docker
container (again,
always linked to DNS_SEED). This new Full Node
will do the same thing as the previous Full Nodes: it
will first register with the DNS_SEED server (as described
above, Step 1 in our
drawing).
Once the new
Full Node has registered with the DNS_SEED, if a node gets
a non-null response from the DNS_SEED (which in this
example it would, because the DNS_SEED would have returned
the IP address for Node B (we can assume that the DNS_SEED
simply returns it's "latest" addition to the network), the
new Full Node ("C") will send a handshake() message (i.e.,
call the handshake() function/method) on the IP address it
received back (it only receives one IP node back from the
DNS_SEED), seeking to handshake() with that IP address
whose server (distributed blockchain mining software) is
listening on port (say) 58333, as described above (Step 2
in our drawing), which in our example,
would be node "B".
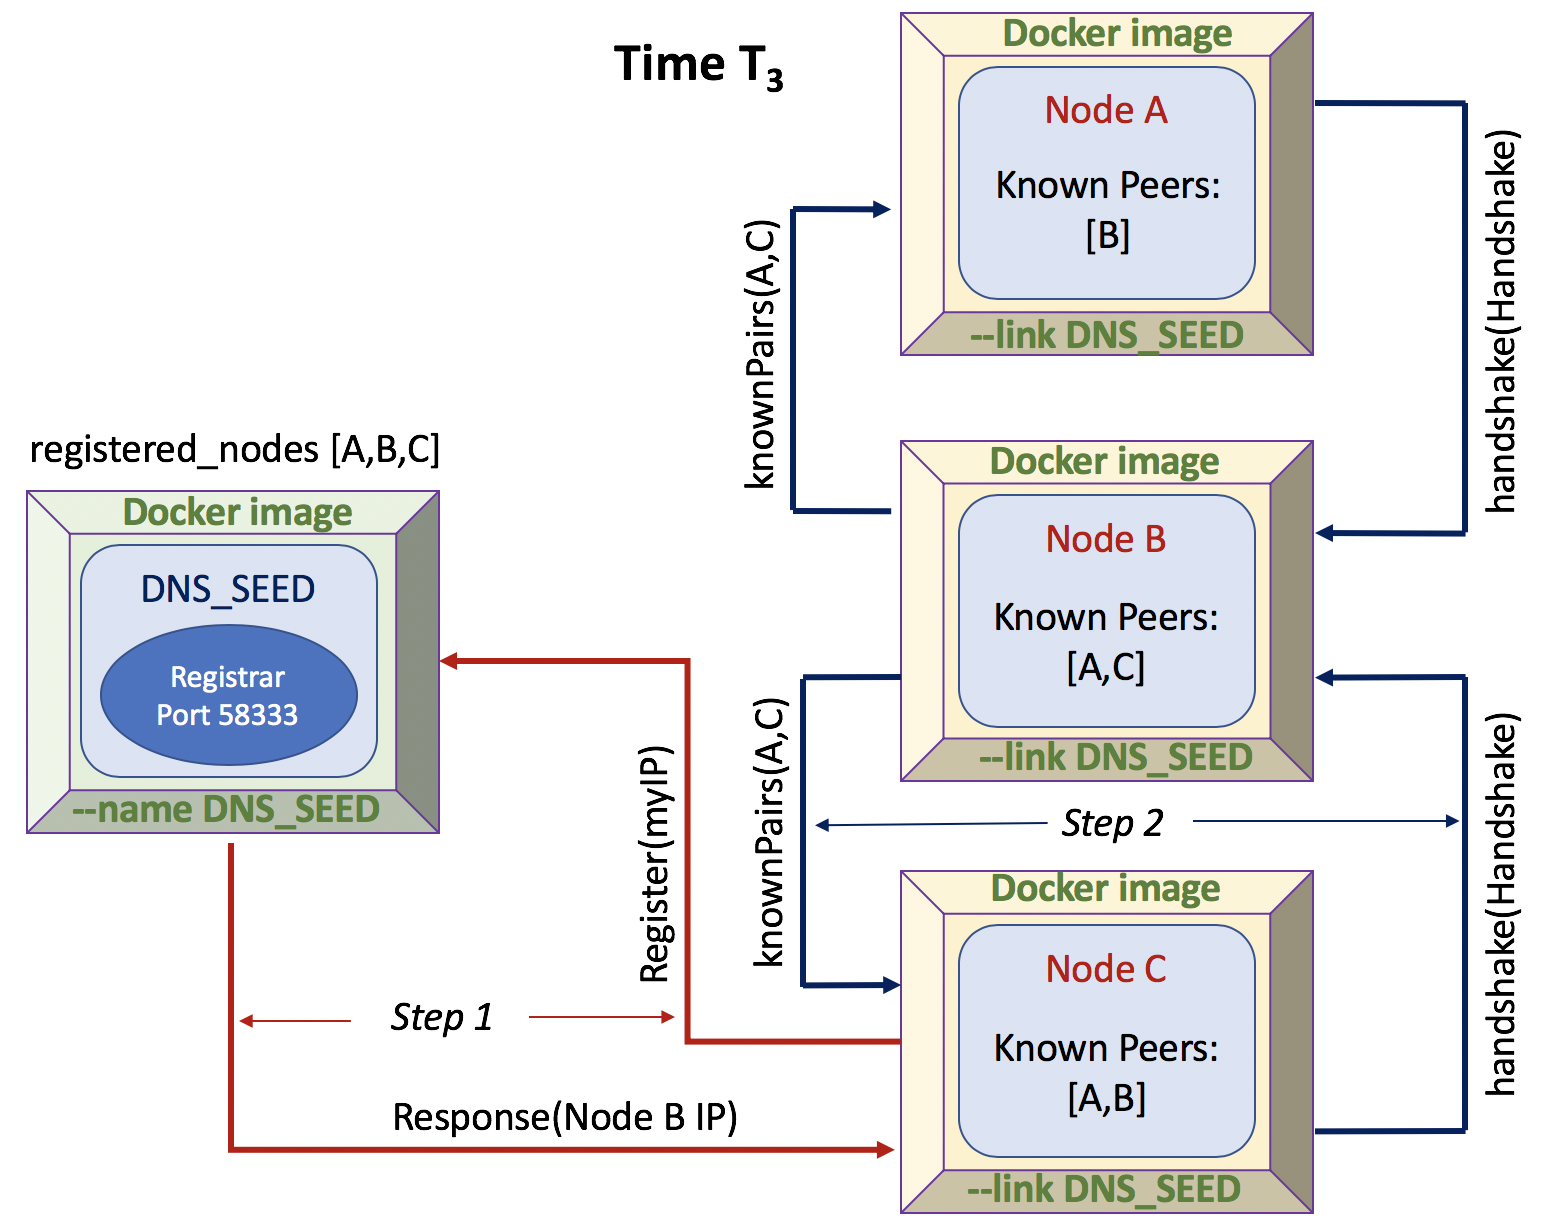
Once the third
newly-launched Full Node has registered with the
DNS_SEED and has conducted a handshake with Node
B (from which it learned of Node A because node
"B" returned its list of known peers, which
includes node "A"), the newly-launched Full Node
("C") will also handshake with any other
peer nodes it has learned from the node it just
shook hands with (in our case, Node "B"), and
thus it will call the handshake()
function/method on Node "A" providing Node A
it's IP Address (that of Node "C").
Note that a Full Node will only
call every given node's
handshake() function/method once...i.e.,
it will maintain knowledge
of which nodes it has already shaken hands
with (your call on how to handle
this...i.e., a second list of handshakes
or a "handshake" flag on the list of known
peers, etc.). If a Full Node
discovers (via known peers) a Full
Node with which it has not already
shaken hands, it will call that
node's handshake() function/method.
In this way, all nodes will have
eventually shaken hands with each other
and it is never the case that a
given node either (a) calls it's own
handshake() function/method or (b) calls
another Full Node's handshake()
function/method more than once.
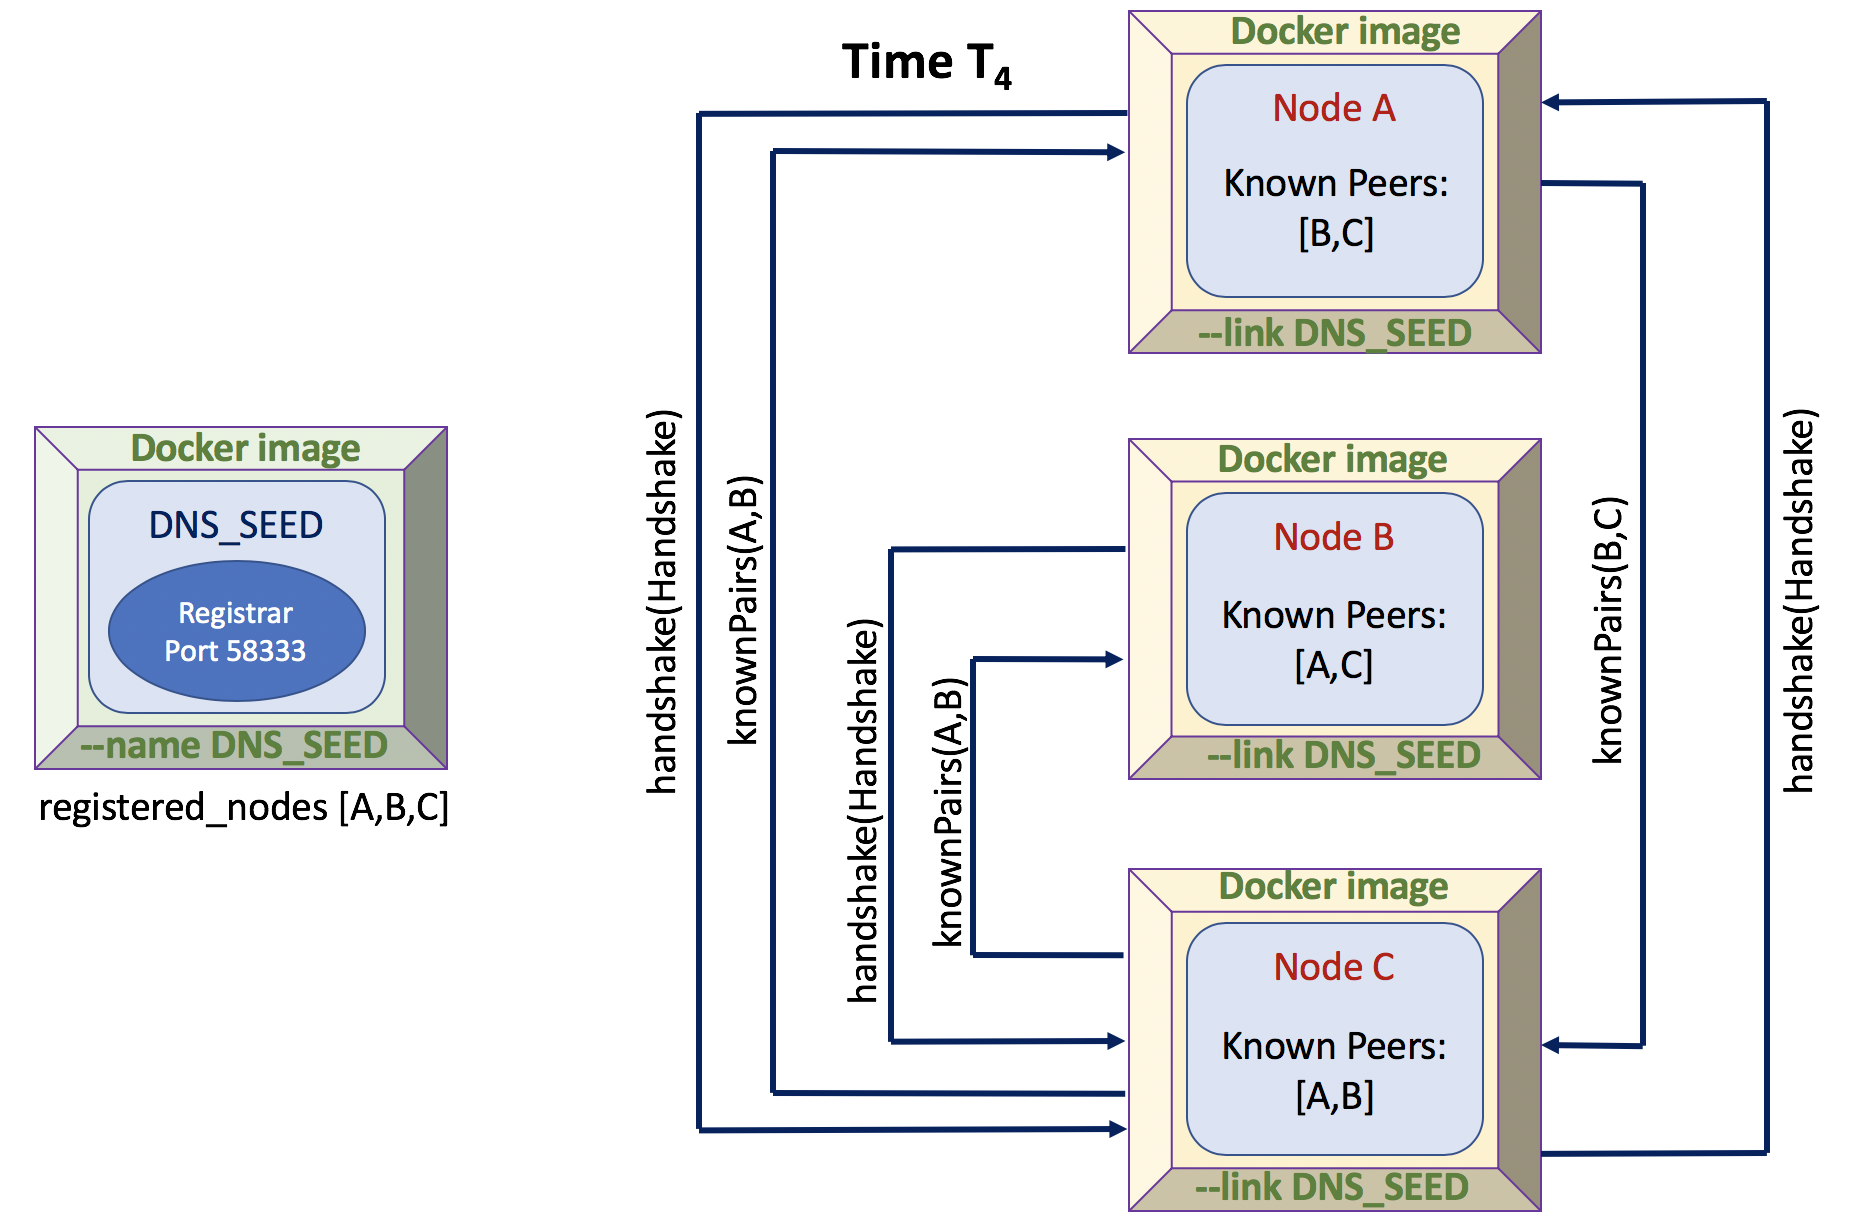
STEP 5 (Time T4):
Once
the third newly-launched Full Node has registered with
the DNS_SEED and has conducted a handshake with Nodes B
and now Node A (Node C learned of Node A from it's
handshake with Node B),
each node will now know of a minimum of two other nodes
(known peers) on the network. Upon learning
of the existence of Node C, Node A will in turn call
Node C's handshake() method, seeking to discover Node
C's list of known peers, which it will add to
its own list of known peers.
Note that in our example, we are not limiting the number
of handshakes with other nodes because we are
intentionally keeping it simple. In a real
blockchain implementation, any given node would not seek
to know of "all" nodes on the network, just a select
subset. We are not now concerned with minimizing network
traffic.
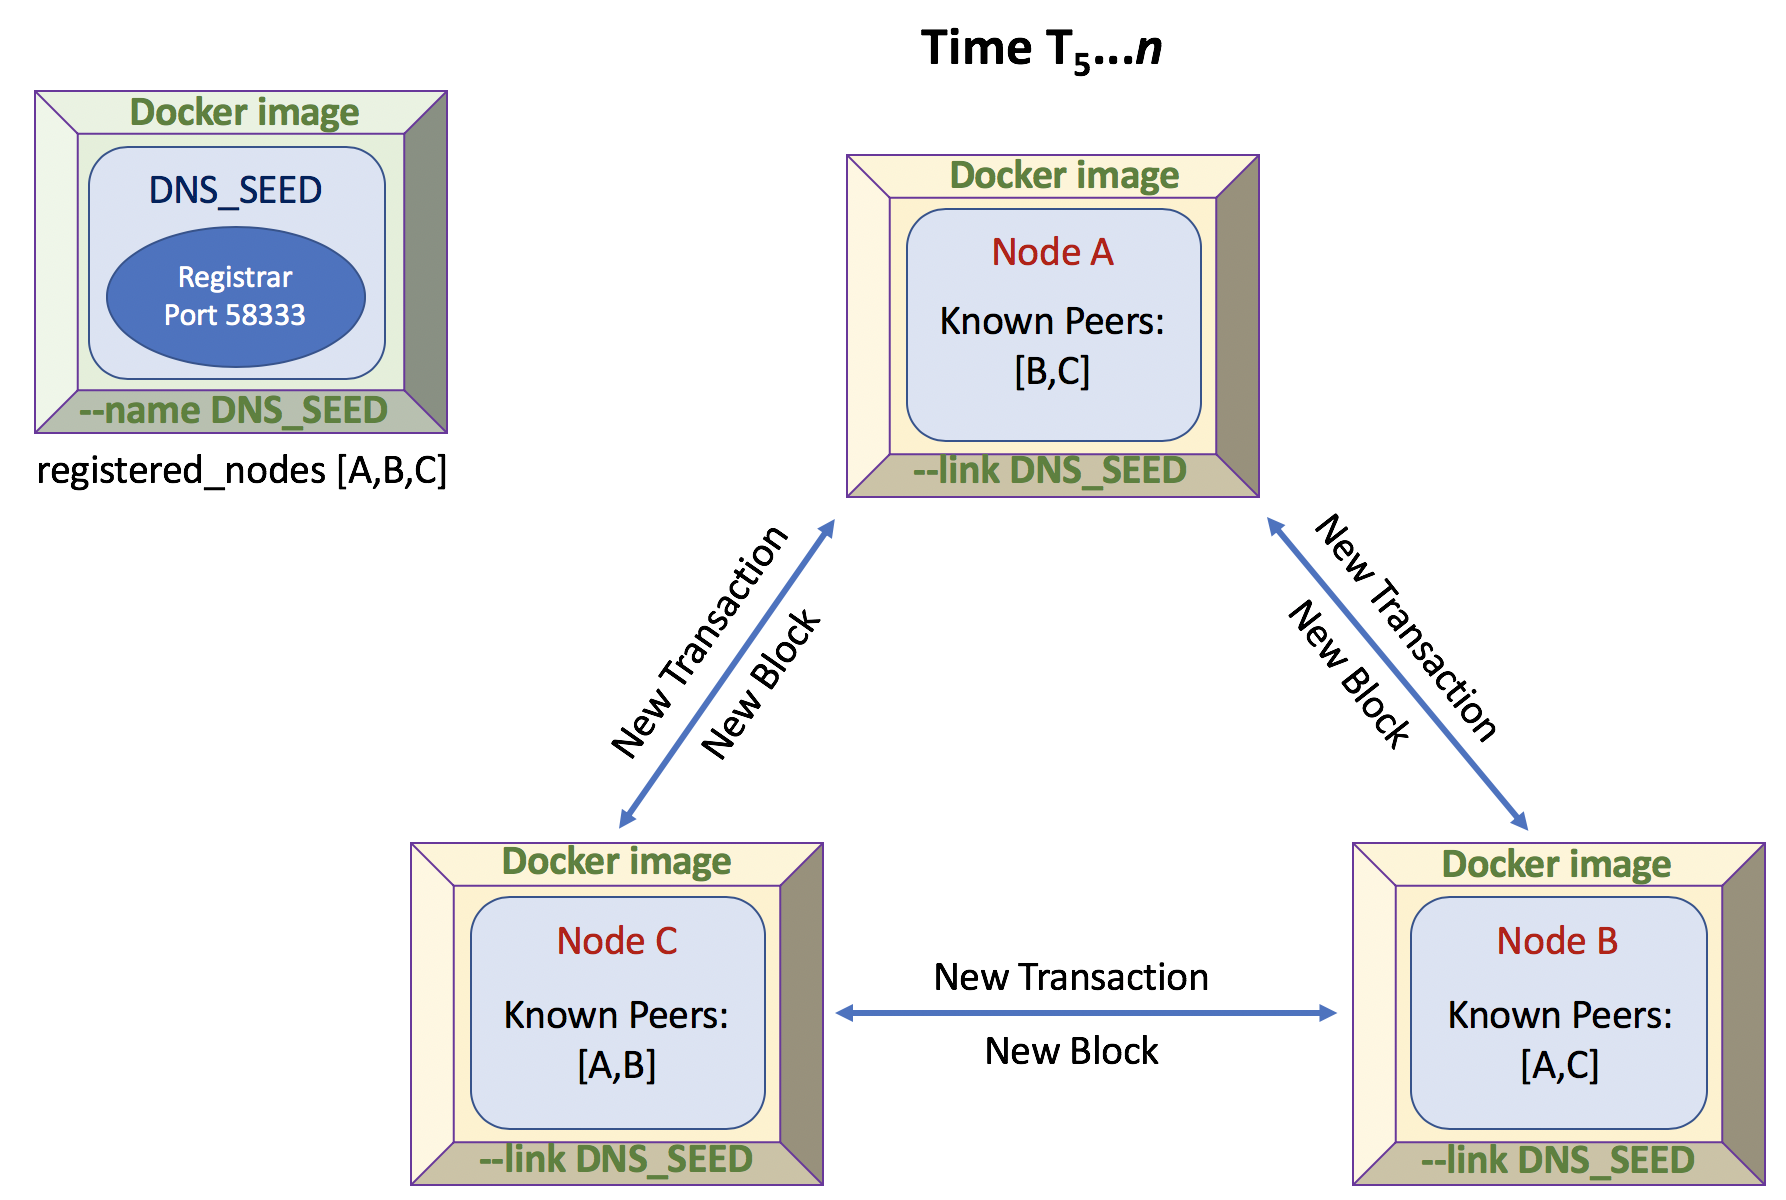
STEP 6 (Time T5..n):
At this point, each node's
mining activity can begin (your call on how this state is
recognized...). The distributed mining process will
entail the simulated generation of new Transactions
(as you have been doing in previous labs) and the attempted
mining of a new block (as you did in Lab 8). As each
new mining node "discovers" a new transaction
(periodic generation...your mileage
may vary and you may feel free to tweak this, but start out
with each node discovering a new transaction about
every 3-5 seconds...try to make this random by alternatively
sleeping within the bounds of 2-5 seconds--see python
example below), it adds the newly-created transaction to its
own memory pool and then broadcasts that
transaction to all the other nodes on the network it knows
about (by calling newTransactionBroadcast() on the other
Full Nodes).
So for example, if Node C "discovers" (generates) a
new transaction, it will broadcast that transaction to the
other nodes using something like the following
structure/class:
struct/class NewTransaction {
serialized transaction data
}
Each Full Node is listening for NewTransactionBroadcast()
calls on your ephemeral PORT (or other port depending on
your network solution, ie., RMI, WCF, etc.), and when a node
receives a new transaction from the network, it checks first
if the new transaction is already in it's memory pool of
transactions, and if it's not, it will add the new
transaction to its working memory pool of transactions it is
adding to the block it is trying to mine. For this
lab, we will assume that all transactions broadcast are
valid transactions. The node then will propagate
(gossip) the new transaction by calling
NewTransactionBroadcast on all nodes in its list of known
nodes. A given node will never broadcast a given
transaction more than once.
The difficulty you will use in your mining for this lab will
be 0x1e200000 which will average a
successful new block generation with the correct nonce of
between 1 and 17 seconds (μ ~ 7 seconds with one
miner). 0x1e200000 will
yield a hex target of
0x0000200000000000000000000000000000000000000000000000000000000000
(decimal:
220855883097298041197912187592864814478435487109452369765200775161577472).
Once a new block is mined by a Full Node, it will immediately
broadcast this new block (with all of its transaction IDs)
as a new structure or class:
struct/class NewBlockMined {
serialized block data of successful nonce
(which will include Block and Header)
}
as: NewTransactionBroadcast(myNewBlockMined)
As other nodes receive the newly-mined block solution. For this lab, we will
assume that all new blocks broadcast are
valid. The node then will propagate (gossip)
the new block by calling NewBlockBroadcast(newBlock)
on all nodes in its list of known nodes.
A given node will never broadcast a given block more
than once to each known node.
Upon receipt of a new block broadcast, each mining node will
simply add the new block to its blockchain. Remember,
each new Block is added on (bound to) to a specific prior
block off of which the miner is working, which may be the
genesis block in the case of the first mined block.
Once a miner publishes a newly-mined block, each
miner (including the miner that produced the
correct result) will sleep for a random number of seconds
(as integers) between 0 and 3 seconds, i.e., in the range
{0..3}. As an example, the python command
print(random.randint(0,3)) will produce this result.
This will reduce the chance that miners will all produce
blocks at "about the same time", since we assume all Full
Nodes are running on the same physical processor(s) (as
all containers are likely running on the same physical
machine) and they will tend (through the round-robin
load-balancing of the OS scheduler) to produce results at
about the same time. Adding this randomness will
reduce this likelihood and produce more "clean winners",
which should reduce the chance of forks, which we would
like to avoid in this lab.
You may feel free to add further nodes if you
wish, this is up to you if you're curious, but not
required. A Full Node is only to connect to a MAX of
two other nodes in your network.
FINAL STEP:
Run it and debug it.
You will likely discover "timing-related" or "order-related"
issues as you begin to run and debug your distributed
solution. You will need to think about issues, and how
you will handle them, including:
What if I receive a transaction I already know about?
(ignore it?)
What if I'm mining a block and I receive a new
transaction? (add it and reset your nonce to 0?)
What data structure will I use to hold my "working set" of unspent
transactions? (lists and maps are always a good choice)
How will I serialize my transactions for networked
communication? (language-dependent)
How will I serialize my newly-mined blocks for networked communication?
(network-framework dependent, ie, Java RMI, Windows C# WCF,
python sockets, etc.)
How do you handle multiple methods/functions listening on a
single port (e.g., 58333)? Or do you establish each
listener on a separate port (i.e., use multiple ports)?
This may depend on the method of communication you choose
(RMI, gRPC, WCF, sockets, etc.). You are completely free
to make this decision as you see fit...whatever is easier.
How will you handle forks which might occur? You don't
have to worry about handling forks unless you are encountering
them.
How do you govern the "gossiping" between the nodes...that is
to say, how do you make sure that transactions and blocks are
not re-broadcast over and over again?
To prepare for submission, create a tarball of your DNS_SEED
container and one of your Full Nodes for Problem 3:
Commit a new image of both using a command similar to (use of
course the actual names you've used for this problem below):
docker commit DNS_SEED dns_seed:lab7
docker commit FULL_NODE full_node:lab7
Then, save the images to a tarball:
$ docker save -o DNSSeed.tar dns_seed:lab7
$ docker save -o FullNode.tar full_node:lab7
Then, zip them up:
$ bzip2 DNSSeed.tar
[be patient...may take a few secs]
$ bzip2 FullNode.tar
[be patient...may take a few secs]
Now scp your two bzip'd files to your [userid] directory
under:
y /stage/MPCS56600/
Submit source code that you created for Problem 3 and a README
as usual into your lab7 repo directory as described below.
References:
You may find the following references helpful (in
addition to the links from previous labs):
General gRPC
Tutorial Links
java [https://grpc.io/docs/tutorials/basic/java.html]
C++ [https://grpc.io/docs/tutorials/basic/c.html#generating-client-and-server-code]
go [https://grpc.io/docs/quickstart/go.html#install-protocol-buffers-v3]
python [https://grpc.io/docs/tutorials/basic/python.html]
gRPC Guides: https://grpc.io/docs/guides/
gRPC Tutorials: https://grpc.io/docs/tutorials/
C++: https://grpc.io/docs/quickstart/cpp.html
Java: https://grpc.io/docs/quickstart/java.html
Go: https://grpc.io/docs/quickstart/go.html
Python: https://grpc.io/docs/quickstart/python.html
Java RMI:
Java
RMI and Object Serialization FAQ
Tutorial's Point RMI Tutorial
Oracle's RMI Getting
Started Guide
JavaTpoint's RMI
Guide
Windows WCF:
WCF
Tutorial
Microsoft Tutorial
Code Project's Beginner's
Guide to WCF
Python-related RPC
mechanisms:
Python
Pickle:
Python Docs Pickle
Python UsingPickle
Python Pickle DataCamp
Python JSON-RPC:
Python PyPi
JSON-RPC
Python JSON-RPC Github
example (not tested...)
Python JSON-RPC on jsonrpc.org
Another
example
Other Examples of RPC mechanisms:
Go:
Go example
Medium's article
Haskell:
The
World's Dumbest RPC Example in Haskell (untested)
Hackage example of JSON-RPC
in Haskell
General Docker Tutorial Links
Docker
Cheat Sheet
Learn
Docker in 12 Minutes Youtube
Demystifying
Docker Youtube
TutorialsPoint:
Docker Tutorial for Absolute Beginners
Docker
Overview
Ubuntu
package commands