Lab
4 Details for MPCS 56605
Each
lab
will consist of a small problem and details of how to proceed.
Each lab is intended to give every student hands-on experience
with the core concepts and technologies covered during the
course. A student may concentrate, as a team member, on
one technology over another for the final project, but labs are
designed to give each and every student exposure to all the
technologies that come into play. You need to submit labs
to the TAs for grading--see submission instructions below.
Generally, unless otherwise specified, you will have one week to
complete each assigned lab.
See
the
syllabus for information on grading. Turning in lab
assignments on time is required, without exception, and all late deliveries will be
penalized, regardless
of cause. Submit your assignments to the
subversion repository according to the directions on the
syllabus page.
You
may
write Problem 2 in any programming language of your
choice (Solidity is required for Problem 1). Our
suggestion is now is not the time to learn a new programming
language along with the concepts themselves. So our
suggestion is to use whatever programming language you
know best for building your own blockchain.
Lab 4
Due: 4:00 pm, Monday, July 17, 2023
Problem 1: IDE Setup & First Ethereum Contract
Deployment:
BACKGROUND:
You
are going to use Visual Studio Code to create and deploy your
first smart contract. Since this is your first contract,
as well as continuing to set up your environment, we're going to
go gently step-by-step with the instructions. In
subsequent labs, we'll expect you to know how to do all this and
the instructions will be less detailed and more directive than
the gentle step-by-step of this lab.
WHAT YOU NEED TO DO:
You are going to run an Ethereum blockchain (Ganache) and deploy your first smart contract onto it.
STEP 1:
You want to install the Juan Blanco Solidity
extension into VS Code so you can enjoy syntax highlighting, ease
of compilation, etc. So open up Visual Studio Code and click
on the Extensions icon on the icon bar:

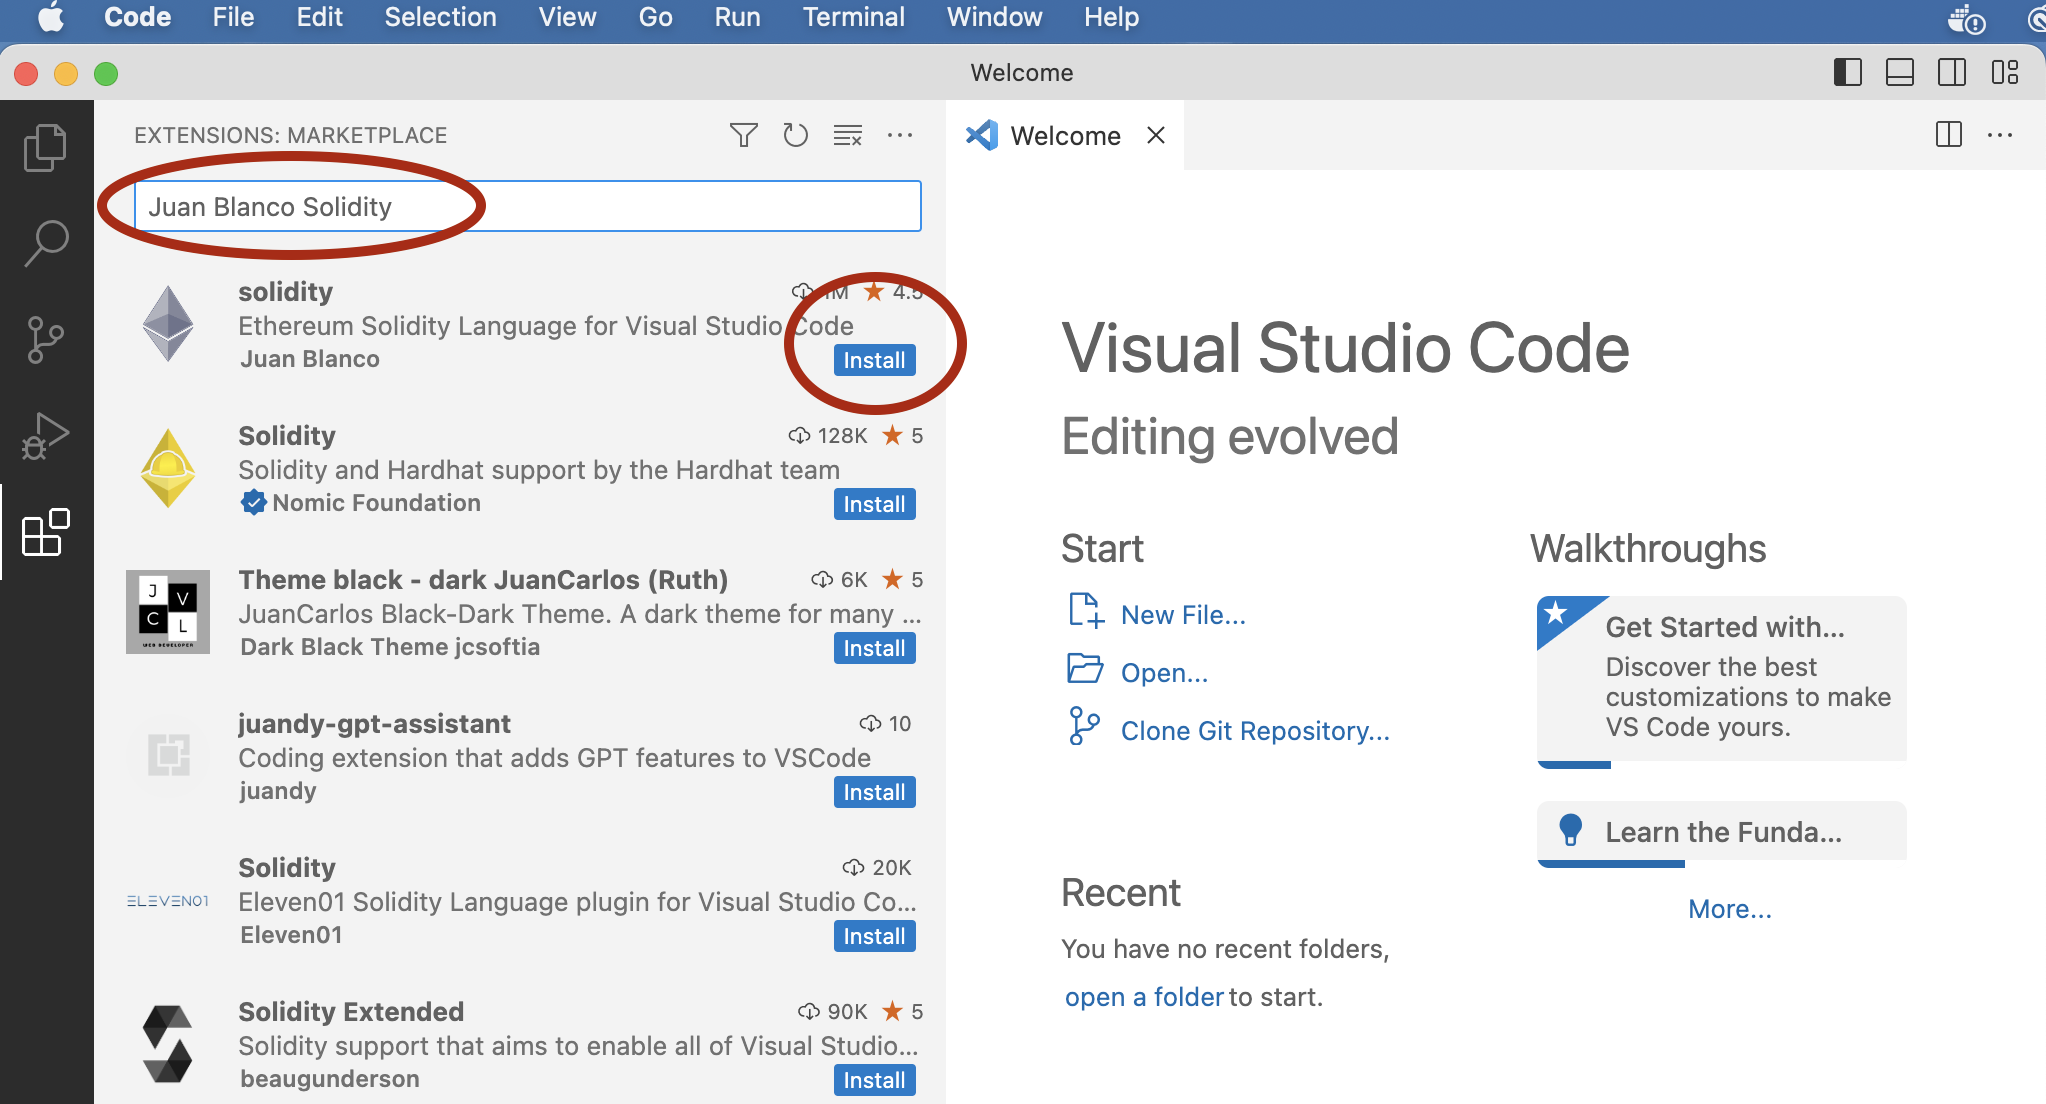
STEP 2:
Once you have clicked on the extensions icon, type
"Juan Blanco Solidity" into the Extensions: Marketplace search bar
and then click on the blue "Install" button next to the Juan
Blanco solidity extension (it may take a second or two to show up
in the marketplace results):
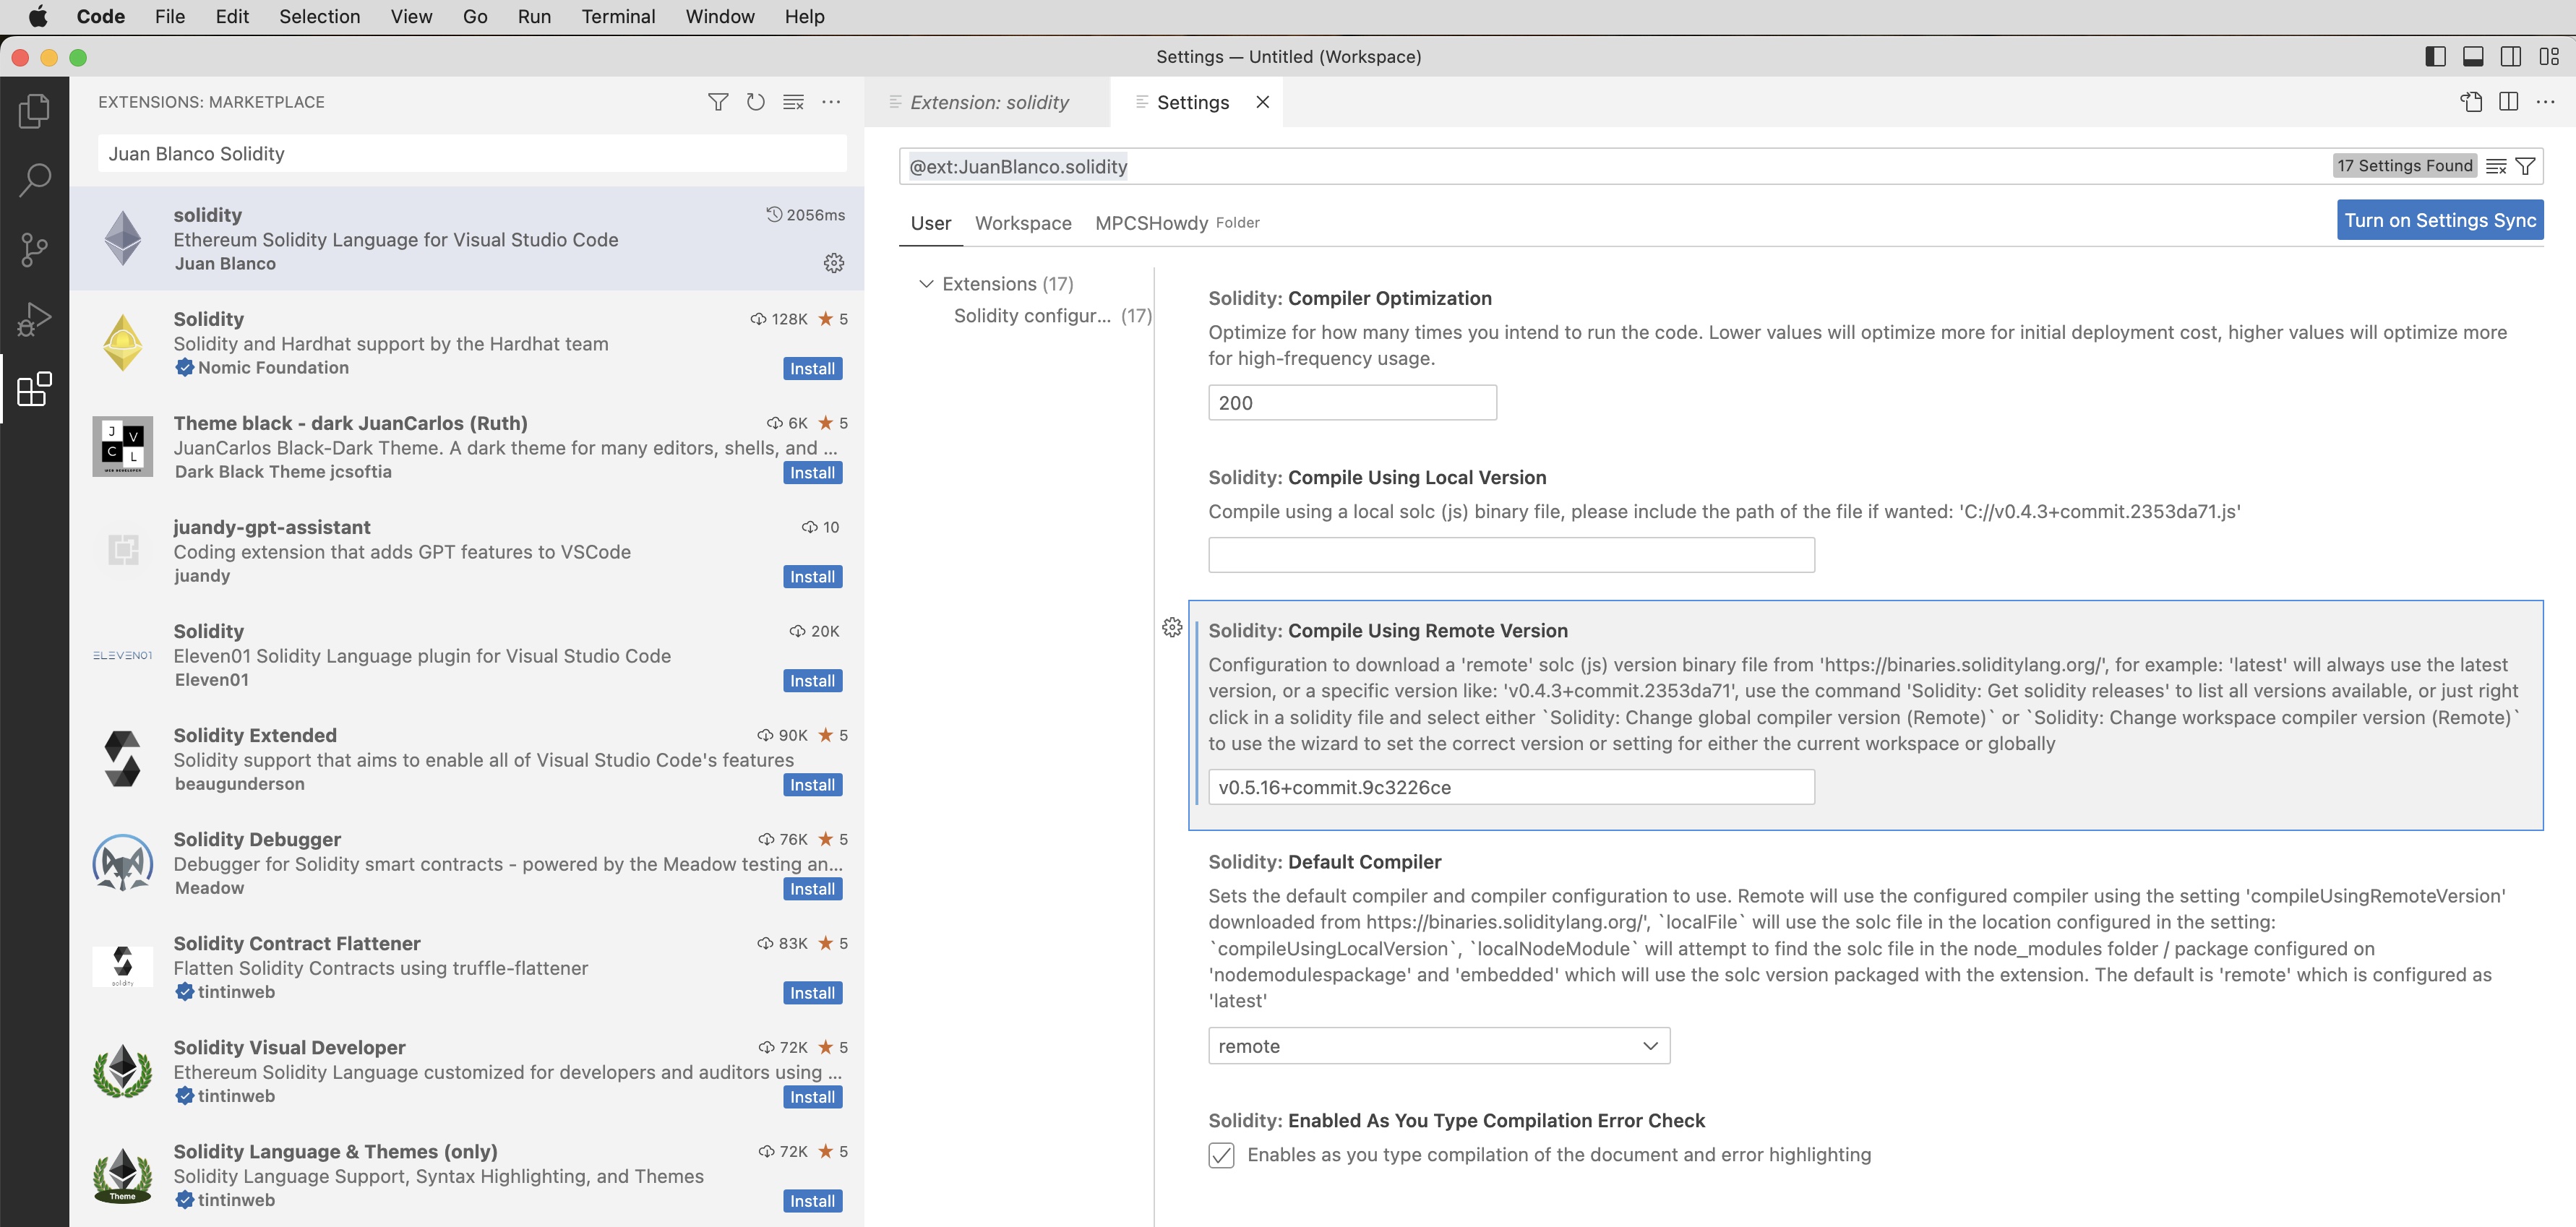
STEP 3:
Once you've installed the Juan Blanco solidity
extension (it can take a few minutes), you need to configure the
correct solidity compiler version that we will be using in the
class, which is "v0.5.16+commit.9c3226ce". Click on the
"settings" gear icon:

and then scroll down the long list of installation/configuration
options for the solidity extension until you come to the external
compiler configuration. For the "Solidity: Compile
Using Remote Version", replace the "latest" default with the
compiler version "v0.5.16+commit.9c3226ce"
(without the quotation marks) and press Enter:
With this, you can simply close the extensions settings windows.
STEP 4:
At the command line, let's create a new directory (you
can of course choose where you want to store your source code)
and cd into it:
$ mkdir -p ~/56605/src/LABS/Lab.4/MPCSHowdy
$ cd ~/56605/src/LABS/Lab.4/MPCSHowdy
STEP 5:
Now we want to run "truffle init" (you installed
truffle in Lab 1) in our new ~/56605/src/LABS/Lab.4/MPCSHowdy
directory:
$ truffle init
After running init, see what new files have appeared in your
directory:
$ find .
.
./migrations
./migrations/1_initial_migration.js
./test
./test/.gitkeep
./contracts
./contracts/Migrations.sol
./truffle-config.js
Sweet! as they say. You will be modifying truffle-config.js
and the migrations and contracts in the remainder of this section
of the lab.
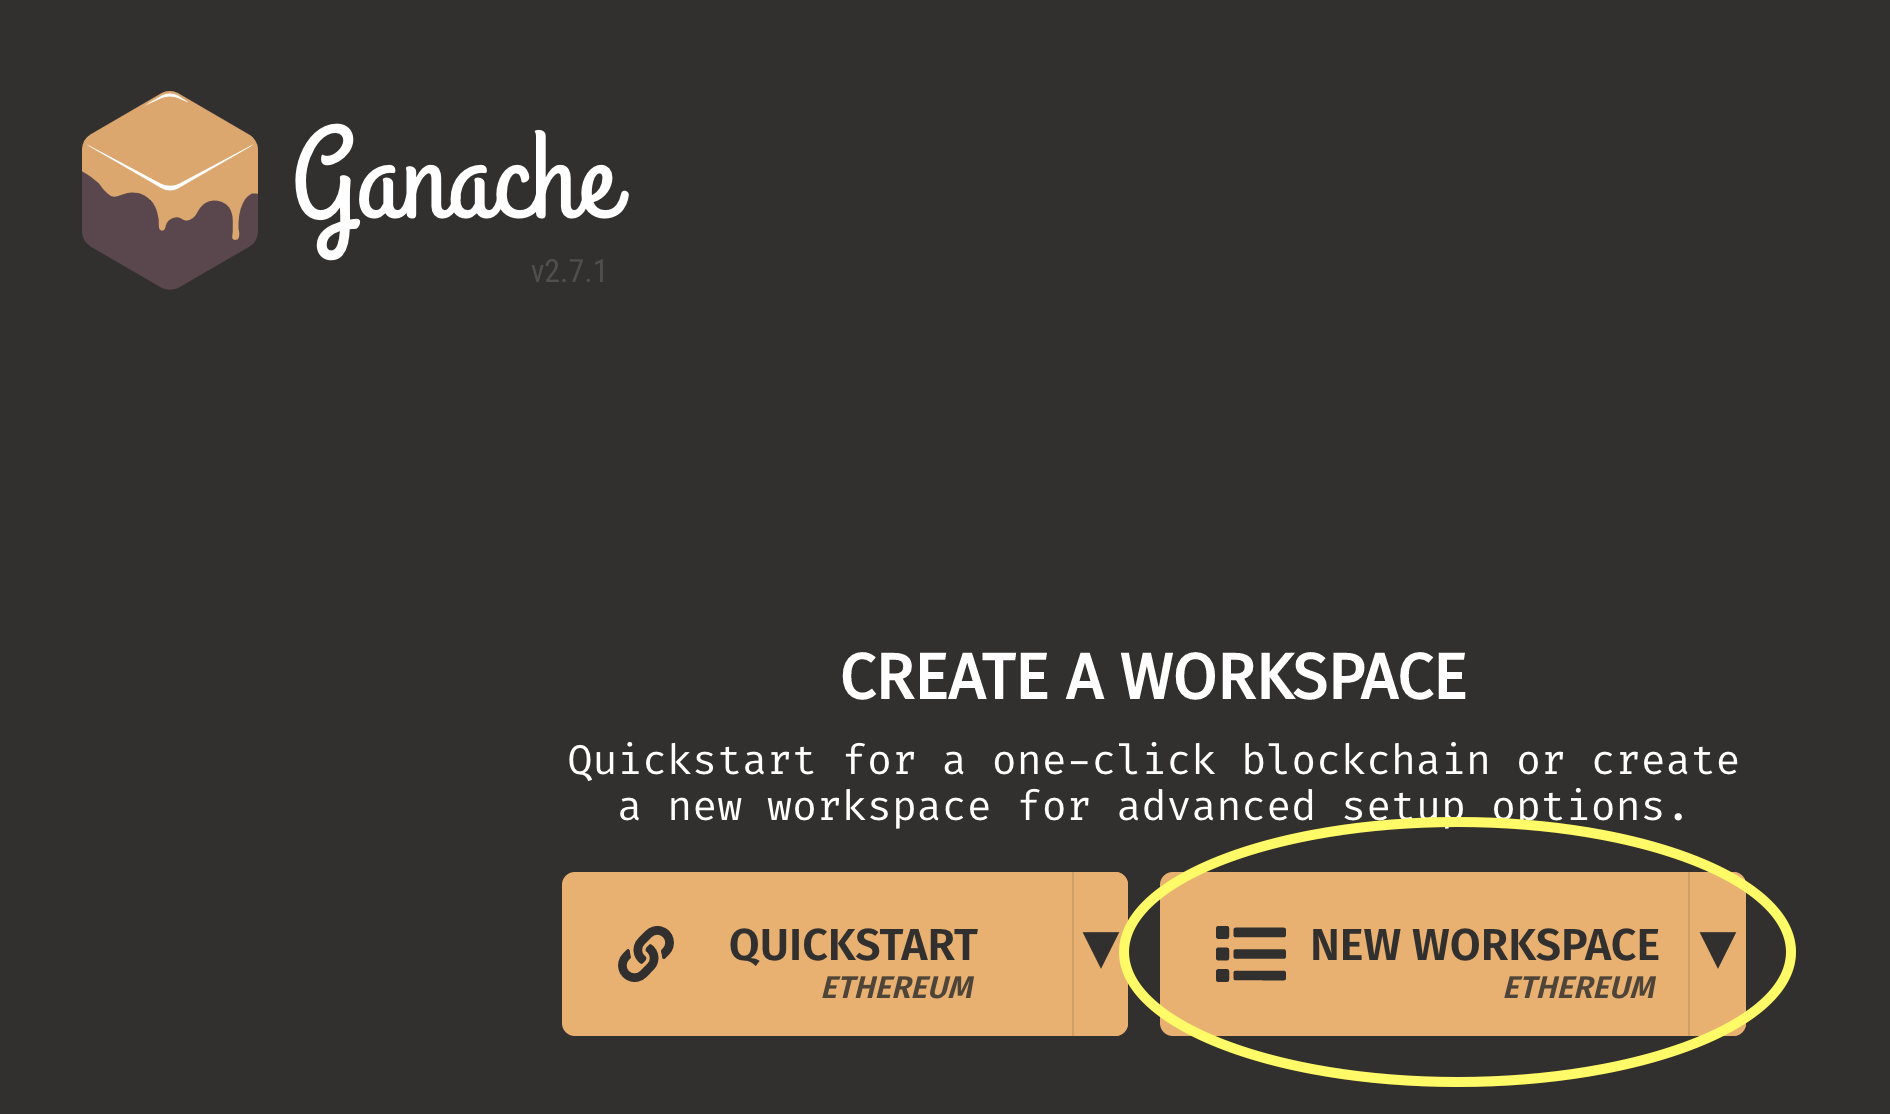
STEP 6:
First, we need to set truffle up to
run against Ganache, so first let's launch ganache from the
Applications directory and let's create a new workspace for our
first contract:
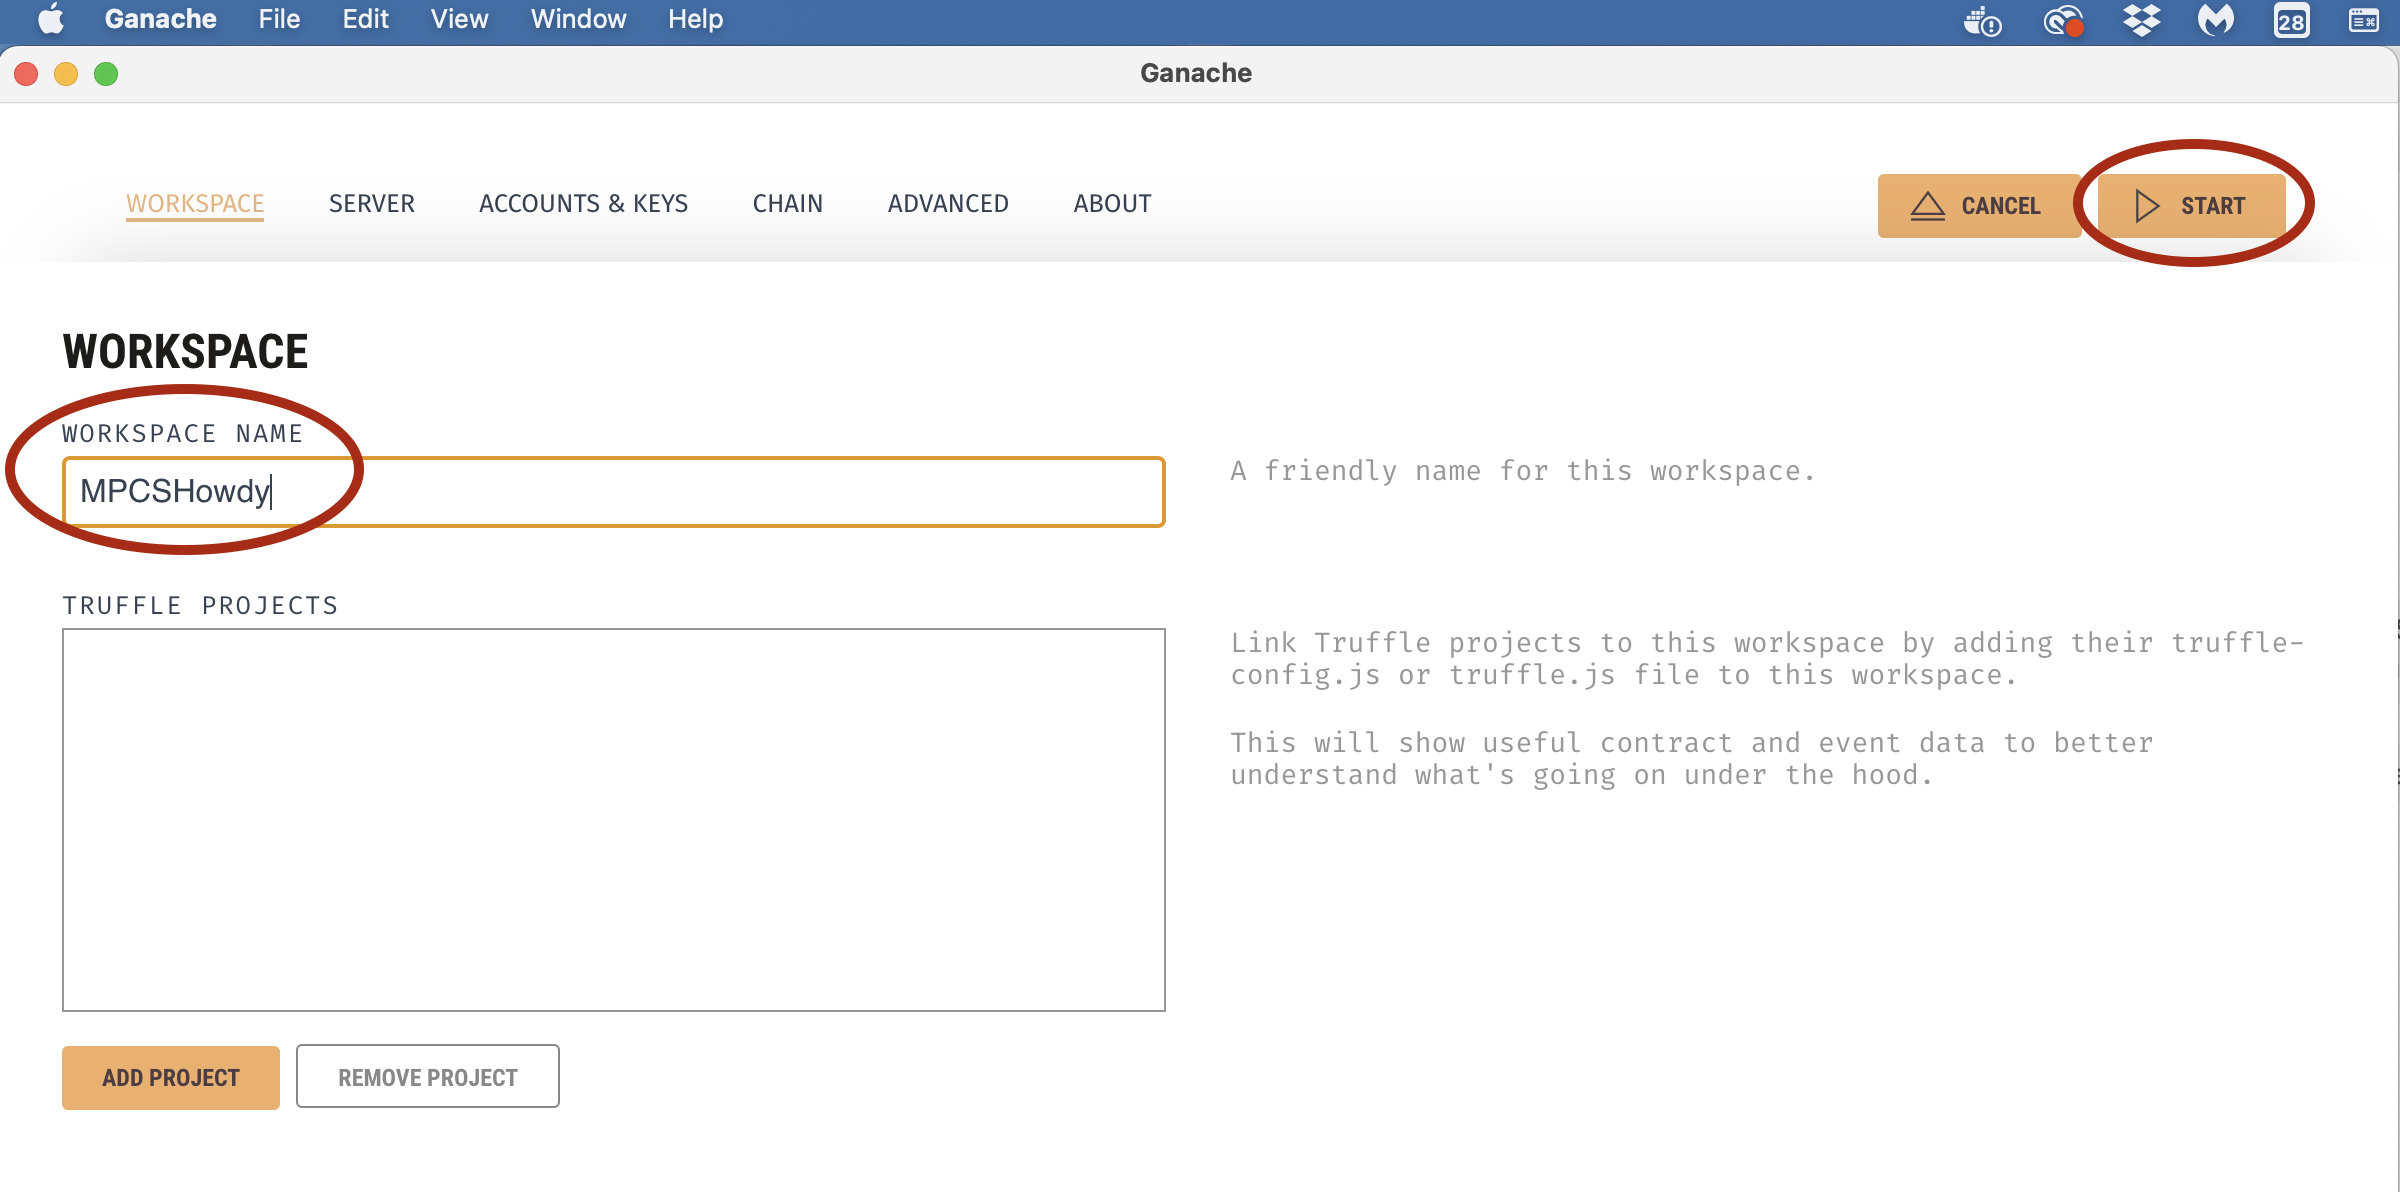
Now, let's create a new workspace called "MPCSHowdy". Type
in "MPCSHowdy" (without the quotation marks) into the Workspace
Name field, and then click on "ADD PROJECT":
Once you've added the new project, you'll see your new workspace
appear and a listing of all the new accounts:
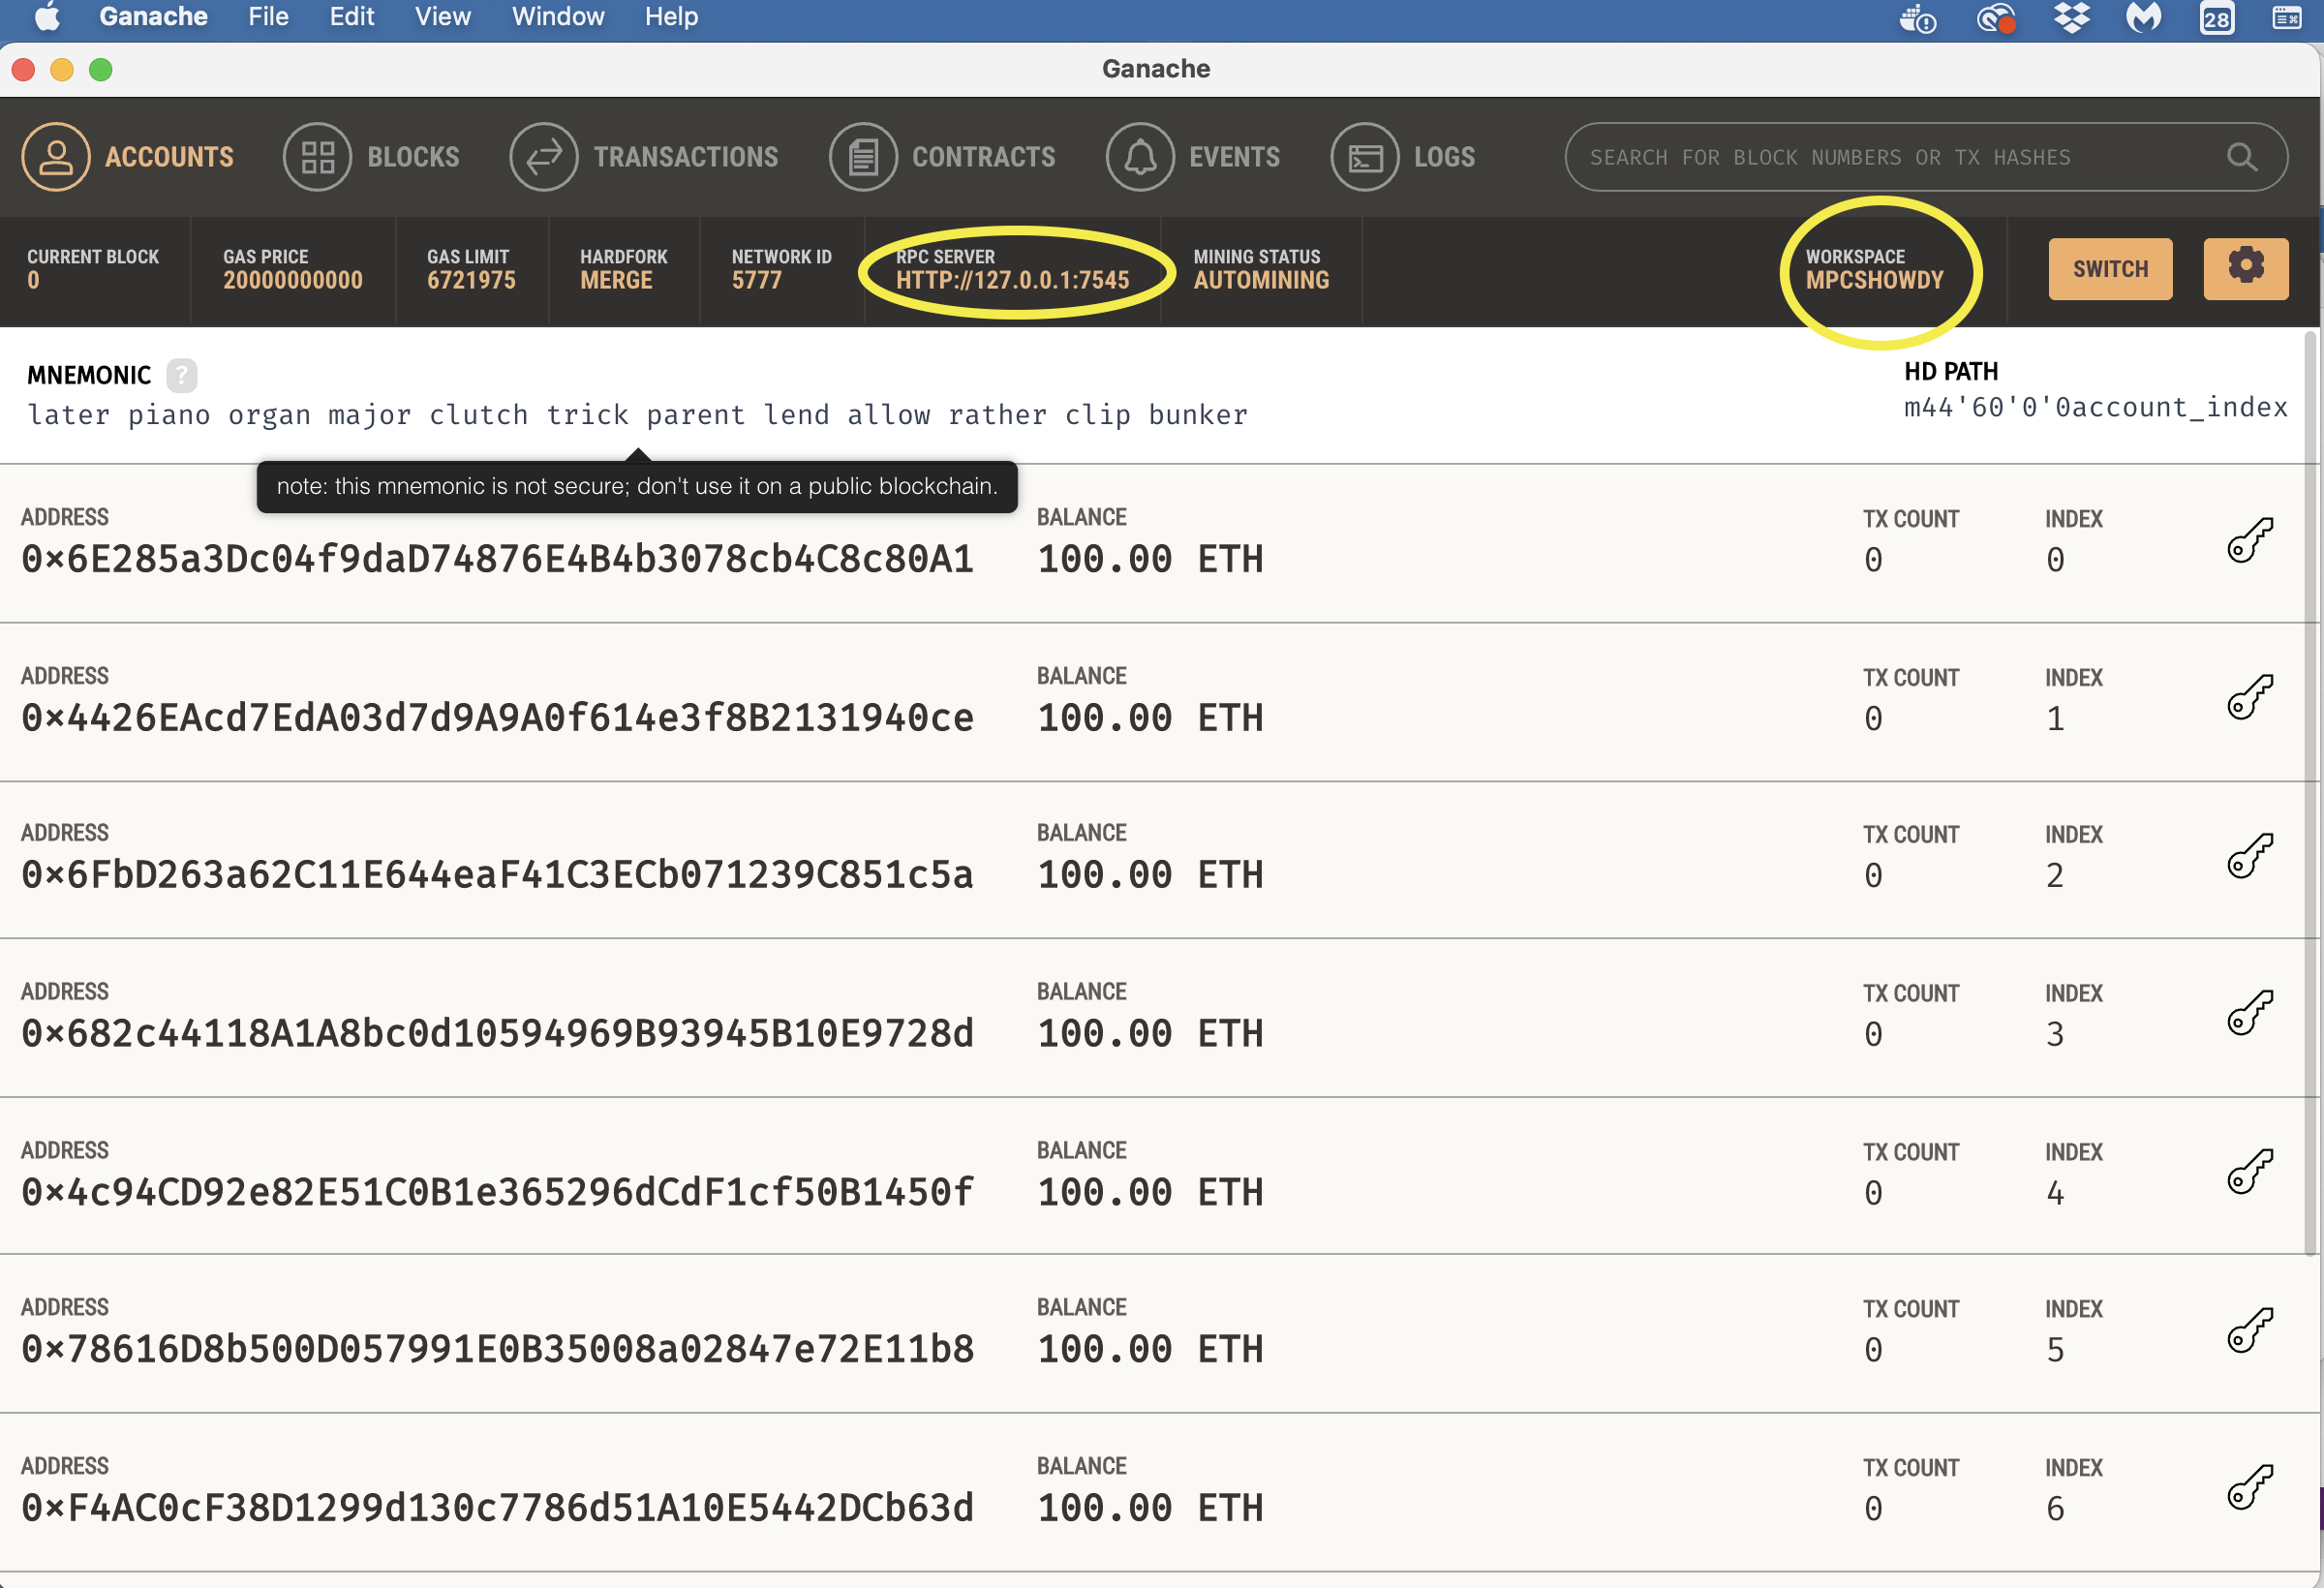
Note that your new workspace is named "MPCSHOWDY" and your new
RPC SERVER is effectively localhost (127.0.0.1) listening on
port 7545. This is important so remember it, as it
leads us to our first coding in our new MS Code project.
You can use the geth (goethereum) client console tool to view
these accounts from the command line. To do so, simply
attach geth to your running ganache application (on port 7545):
$ geth attach
http://127.0.0.1:7545
WARN [05-29|06:47:42.487] Enabling deprecated personal
namespace
Welcome to the Geth JavaScript console!
instance: Ganache/v7.7.3/EthereumJS
TestRPC/v7.7.3/ethereum-js
coinbase: 0x0000000000000000000000000000000000000000
at block: 5 (Sun May 28 2023 15:46:15 GMT-0500 (CDT))
modules: eth:1.0 evm:1.0 net:1.0 personal:1.0
rpc:1.0 web3:1.0
To exit, press ctrl-d or type exit
(reverse-i-search)`balance': ^C
> eth.accounts
["0x6e285a3dc04f9dad74876e4b4b3078cb4c8c80a1",
"0x4426eacd7eda03d7d9a9a0f614e3f8b2131940ce",
"0x6fbd263a62c11e644eaf41c3ecb071239c851c5a",
"0x682c44118a1a8bc0d10594969b93945b10e9728d",
"0x4c94cd92e82e51c0b1e365296dcdf1cf50b1450f",
"0x78616d8b500d057991e0b35008a02847e72e11b8",
"0xf4ac0cf38d1299d130c7786d51a10e5442dcb63d",
"0xf9d28f831ae011d26b8c71510c4a23728e98f6ef",
"0xf053ae36277cf5f70adb93499ebbca844c885c1e",
"0xd7088abaf3d7ab7d753519a33a1dfa2a6108ba37"]
> web3.fromWei(eth.getBalance(eth.accounts[0]))
100
>
web3.fromWei(eth.getBalance("0x4426eacd7eda03d7d9a9a0f614e3f8b2131940ce"))
100
> eth.getBalance("0x4426eacd7eda03d7d9a9a0f614e3f8b2131940ce")
100000000000000000000
This will give you a taste of how you can use geth's eth
and web3 interfaces to interact with ethereum blocks,
transactions, accounts, etc. Notice eth.accounts
will print out an array of all your accounts (these accounts
match the accounts in your ganache application). You can
then interact with individual accounts either by entering the
account hex address or by simply referencing the appropriate
account index from the array.
STEP 7:
Switch back into MS Code and from the main menu
choose "Open" on the main screen and navigate down to your
MPCSHowdy truffle directory "~/56605/src/LABS/Lab.4/MPCSHowdy" and
open it:
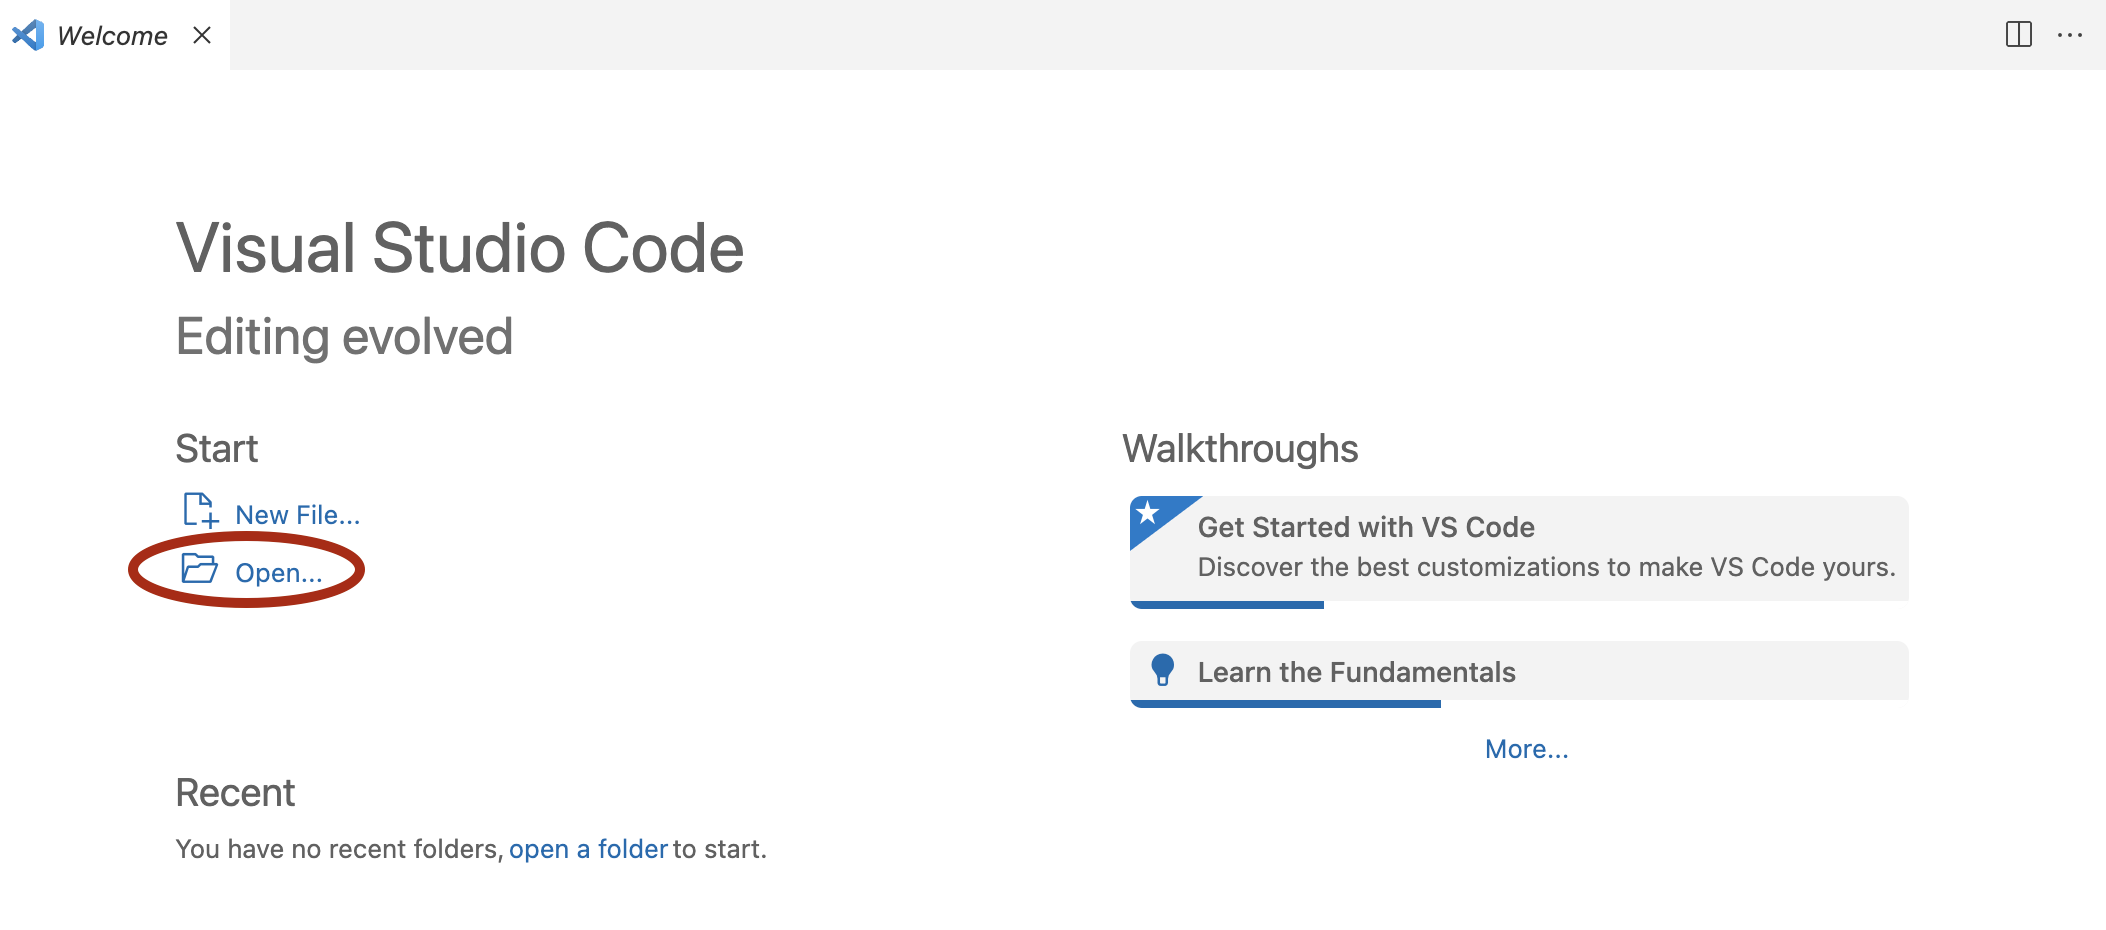
Once you've opened the project, your VS Code screen should
look like this:
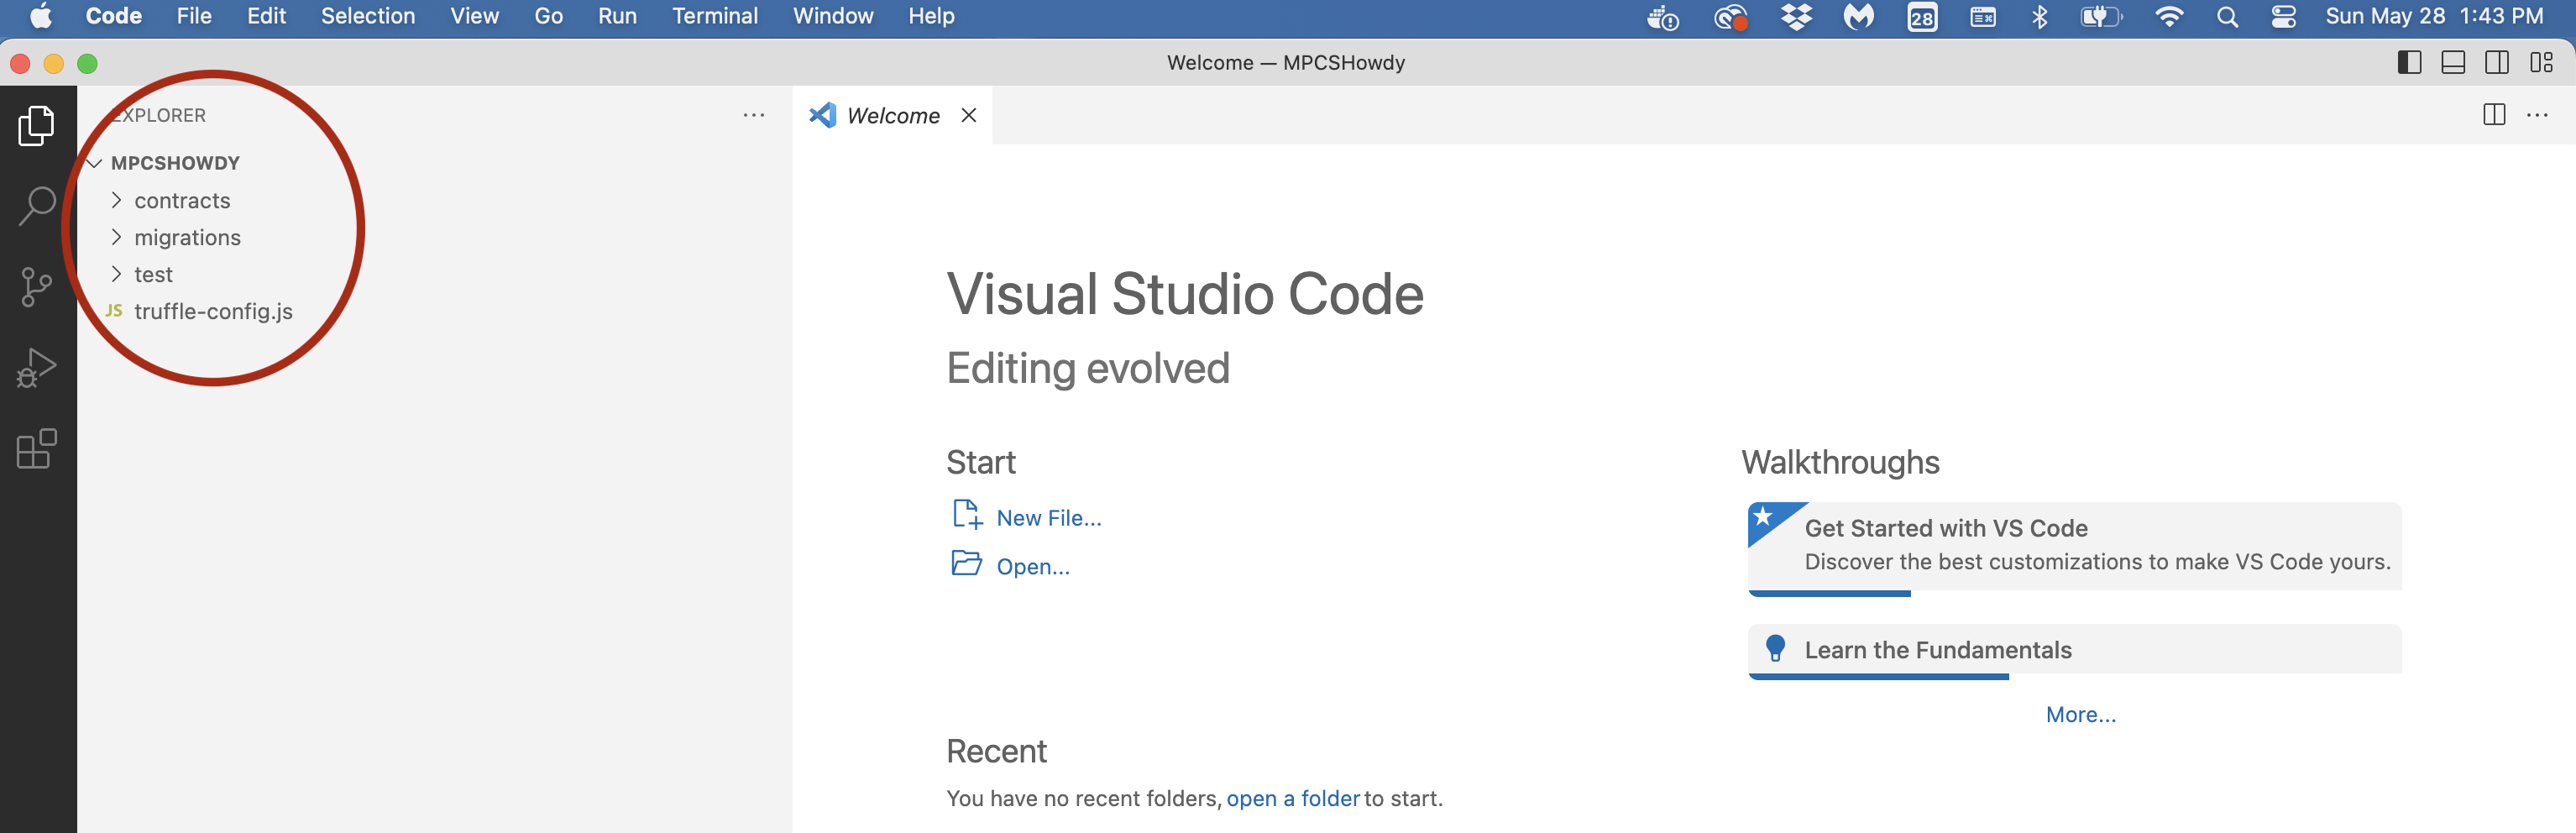
STEP 8:
At this point, you can expand
the various directories you see, exploring what's under
contracts, migrations, and test. Some default stuff which
we will soon edit, but right now, we want to focus on the
truffle-config.js file. Go ahead and click on it to open
it. Scroll down
to the Networks section, and uncomment the lines
for development, and change the port from the default of
8545 (default port for ethereum chains like geth) to our ganache
default port, which is 7545 (remember above we saw that
our ganache app was listening on "HTTP://127.0.0.1:7545"):
...
development: {
host:
"127.0.0.1", // Localhost (default:
none)
port: 7545,
// Standard Ethereum port (default: none)
network_id:
"*", // Any network
(default: none)
},
...
Also, in the same truffle-config.js file, scroll down a little
further to the compilers section, and change the solc
compiler from version "0.8.16" (or whatever you have defaulted)
to our working version of "0.5.16":
...
compilers: {
solc: {
version: "0.5.16",
...
Once you've made these few changes, save the file (Cmd-S).
You can now close the truffle-config.js file. Now we're
ready to do some solidity coding.
STEP 9:
First, let's create our new
HelloPeeps.sol solidity file. Right click in the
Explorer on the contracts directory and choose "New File". Type in "HelloPeeps.sol" and press return.
You'll see that you have a new file under contracts, called
HelloPeeps.sol. You'll also notice that it's quite empty in
the editor window. Well, that's not going to last
long. Type in the following code (type it,
don't just copy and paste it) and then save the file:
// SPDX-License-Identifier: MIT
pragma solidity >=0.5.0;
/** @title HelloPeeps smart contract. */
contract HelloPeeps {
// the greeting variable
string public greeting;
//constructor for the contract
HelloPeeps
constructor() public {
greeting = 'Hello
MPCS 56605 Peeps!';
}
/** @dev say Hello MPCS 56605 Peeps!
* @return greeting--the
greeting to be returned
*/
function hello() public view returns
(string memory) {
return
greeting;
}
/** @dev sets the greeting.
* @param _greeting The new
greeting to be set
*/
function setGreeting(string memory
_greeting) public {
greeting =
_greeting;
}
}
Now, lt's talk through this line by line. The first line
defines the license as MIT which gets rid of an annoying compiler
warning. The second line is a pragma statement that
specifies that our code requires a solidity compiler greater than
or equal to version 0.5.0. We're fine, because we just set
our compiler to 0.5.16 which will work just well.
The next lines that are inside comments /** ... */ that start with
@ are documentation indicators called NatSpecs (similar to javadoc
notations for those familiar with these). "@title" specifies
the title of a contract (or library). "@dev" specifies a
developer's comment and can include basically any advice the
developer wishes to provide. "@return" specifies the return
value of the function, and "@param" provides the description of
function parameters. Using NatSpecs is simply good Solidity
programming practice and you should get used to providing them in
all your code.
The first line of the HelloPeeps contract declares a string
variable called greeting which is declared as
public. Come to think of it, that's a real bad idea, so
let's go ahead and change that to "string private greeting" right
now. The next function is a constructor, which is thankfully
public, which is used to initialize variables among other things,
and in our case, it initializes the greeting to the string "Hello
MPCS 56605 Peeps!". The constructor is called at the
initialization of the contract, and if you don't provide one, one
will be automatically created in the background for you.
The next section defines a new function called hello() that
returns the greeting string (we talk about memory modifiers for
datatypes in class). Whenever hello() function is called, it
returns the greeting string.
The final function provided is a "setter" that allows anyone to
set the greeting. It takes in a string parameter referenced
(commonly with a leading underscore) as _greeting. This
function can be used to change the greeting to a new user-provided
greeting going forward.
STEP 10:
Ok, now, we've got to add a migration for our new contract.
In the Explorer, right click on "migrations" and create a new
migrations file called "2_contracts_migration.js". In this
file, type (don't paste):
var HelloPeeps = artifacts.require("HelloPeeps");
module.exports = function(deployer) {
deployer.deploy(HelloPeeps);
};
and save the file. This file will be used by truffle when we
deploy our new contract onto our local ganache blockchain.
Deployment is the way that we migrate our contracts onto an
ethereum blockchain. We state that we require an artifact
(contract) called HelloPeeps (actually, the contract's bytecode)
and we're going to store it in a variable of the same name.
Then we define a new function for the deployment, and we simply
deploy our new contract onto the blockchain.
STEP 11:
Ok, folks, it's now show time. We now need to merely compile our contracts to
bytecode, then deploy the contracts onto ganache, and then
execute the contract functions. This is (if you've been
following along and not making typos ;-) the fun part. At
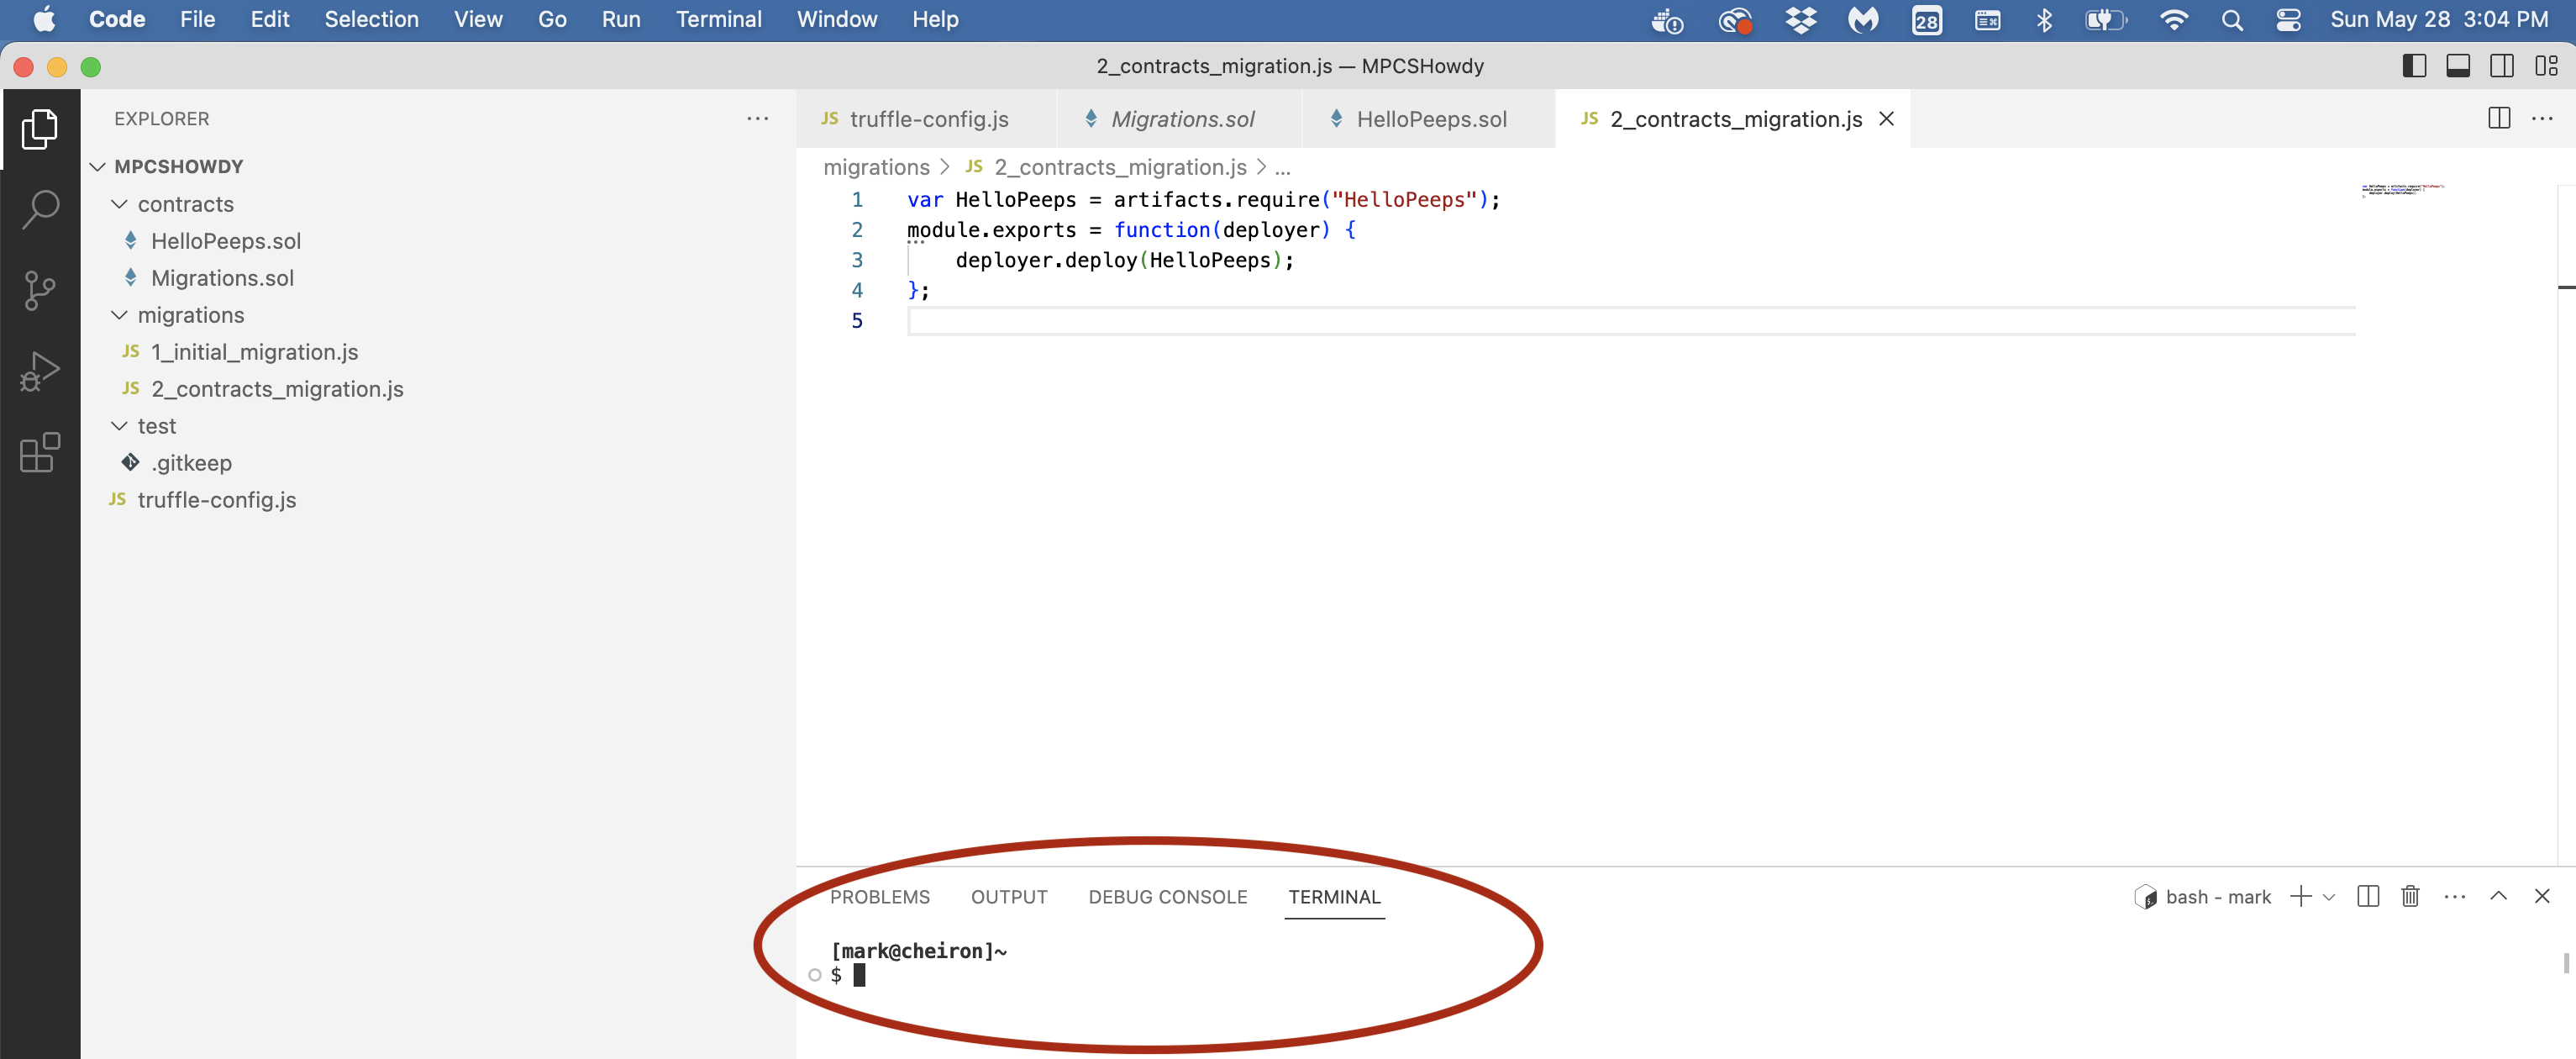
this point, your Explorer window should look like this:

Now, in VS Code, click on View in the main menu, and select
"Terminal". When you do this, it will open up a new pane
at the bottom of your VS Code window that has several tabs in
it, one for problems, one for output, one for debug console, and
one for terminal. You'll be in the terminal and you'll see
your normal terminal prompt in the window. Mine looks like
this:
STEP 12:
DEPLOYMENT:
Click at the prompt in your terminal window pane, and cd into
your code directory ("~/56605/src/LABS/Lab.4/MPCSHowdy" or wherever
you're working), and then type:
$ truffle deploy --reset
You will see (hopefully) something like the following
output:
Compiling your contracts...
===========================
Compiling your contracts...
===========================
> Compiling ./contracts/HelloPeeps.sol
> Compiling ./contracts/Migrations.sol
> Artifacts written to
/Users/mark/56605/src/LABS/Lab.4/MPCSHowdy/build/contracts
> Compiled successfully using:
- solc:
0.5.16+commit.9c3226ce.Emscripten.clang
Starting migrations...
======================
> Network name:
'development'
> Network id:
5777
> Block gas limit: 6721975 (0x6691b7)
1_initial_migration.js
======================
Deploying 'Migrations'
----------------------
> transaction
hash:
0x30f71e55598bacabaa19bd49c24fcb24b1e4c3250a4f9171ac812a86d4b782fb
> Blocks:
0
Seconds: 0
> contract
address:
0x94435AE013172522e2eD648414a235D0f1fdf27a
> block
number: 1
> block
timestamp: 1685306007
>
account:
0x6E285a3Dc04f9daD74876E4B4b3078cb4C8c80A1
>
balance:
99.999347804875
> gas
used:
193243 (0x2f2db)
> gas
price:
3.375 gwei
> value
sent:
0 ETH
> total
cost:
0.000652195125 ETH
> Saving migration to chain.
> Saving artifacts
-------------------------------------
> Total
cost: 0.000652195125 ETH
2_contracts_migration.js
========================
Deploying 'HelloPeeps'
----------------------
> transaction
hash:
0x2f8a7ff467edda9e339b892f84e11336142bf312c8ebac10a419a637080ddc6f
> Blocks:
0
Seconds: 0
> contract
address:
0x4865b237AcC91326dD014D59657abC229722C3Ec
> block
number: 3
> block
timestamp: 1685306008
>
account:
0x6E285a3Dc04f9daD74876E4B4b3078cb4C8c80A1
>
balance:
99.998409027084406434
> gas
used:
248408 (0x3ca58)
> gas
price:
3.176737487 gwei
> value
sent:
0 ETH
> total
cost:
0.000789127005670696 ETH
> Saving migration to chain.
> Saving artifacts
-------------------------------------
> Total
cost: 0.000789127005670696 ETH
Summary
=======
> Total deployments: 2
> Final
cost:
0.001441322130670696 ETH
[mark@cheiron]~/UofC/56605/src/LABS/Lab.4/MPCSHowdy
$
If you see this type of
output, you're in good shape. If you take a look at your
ganache Transactions window, you'll see something like the
following:
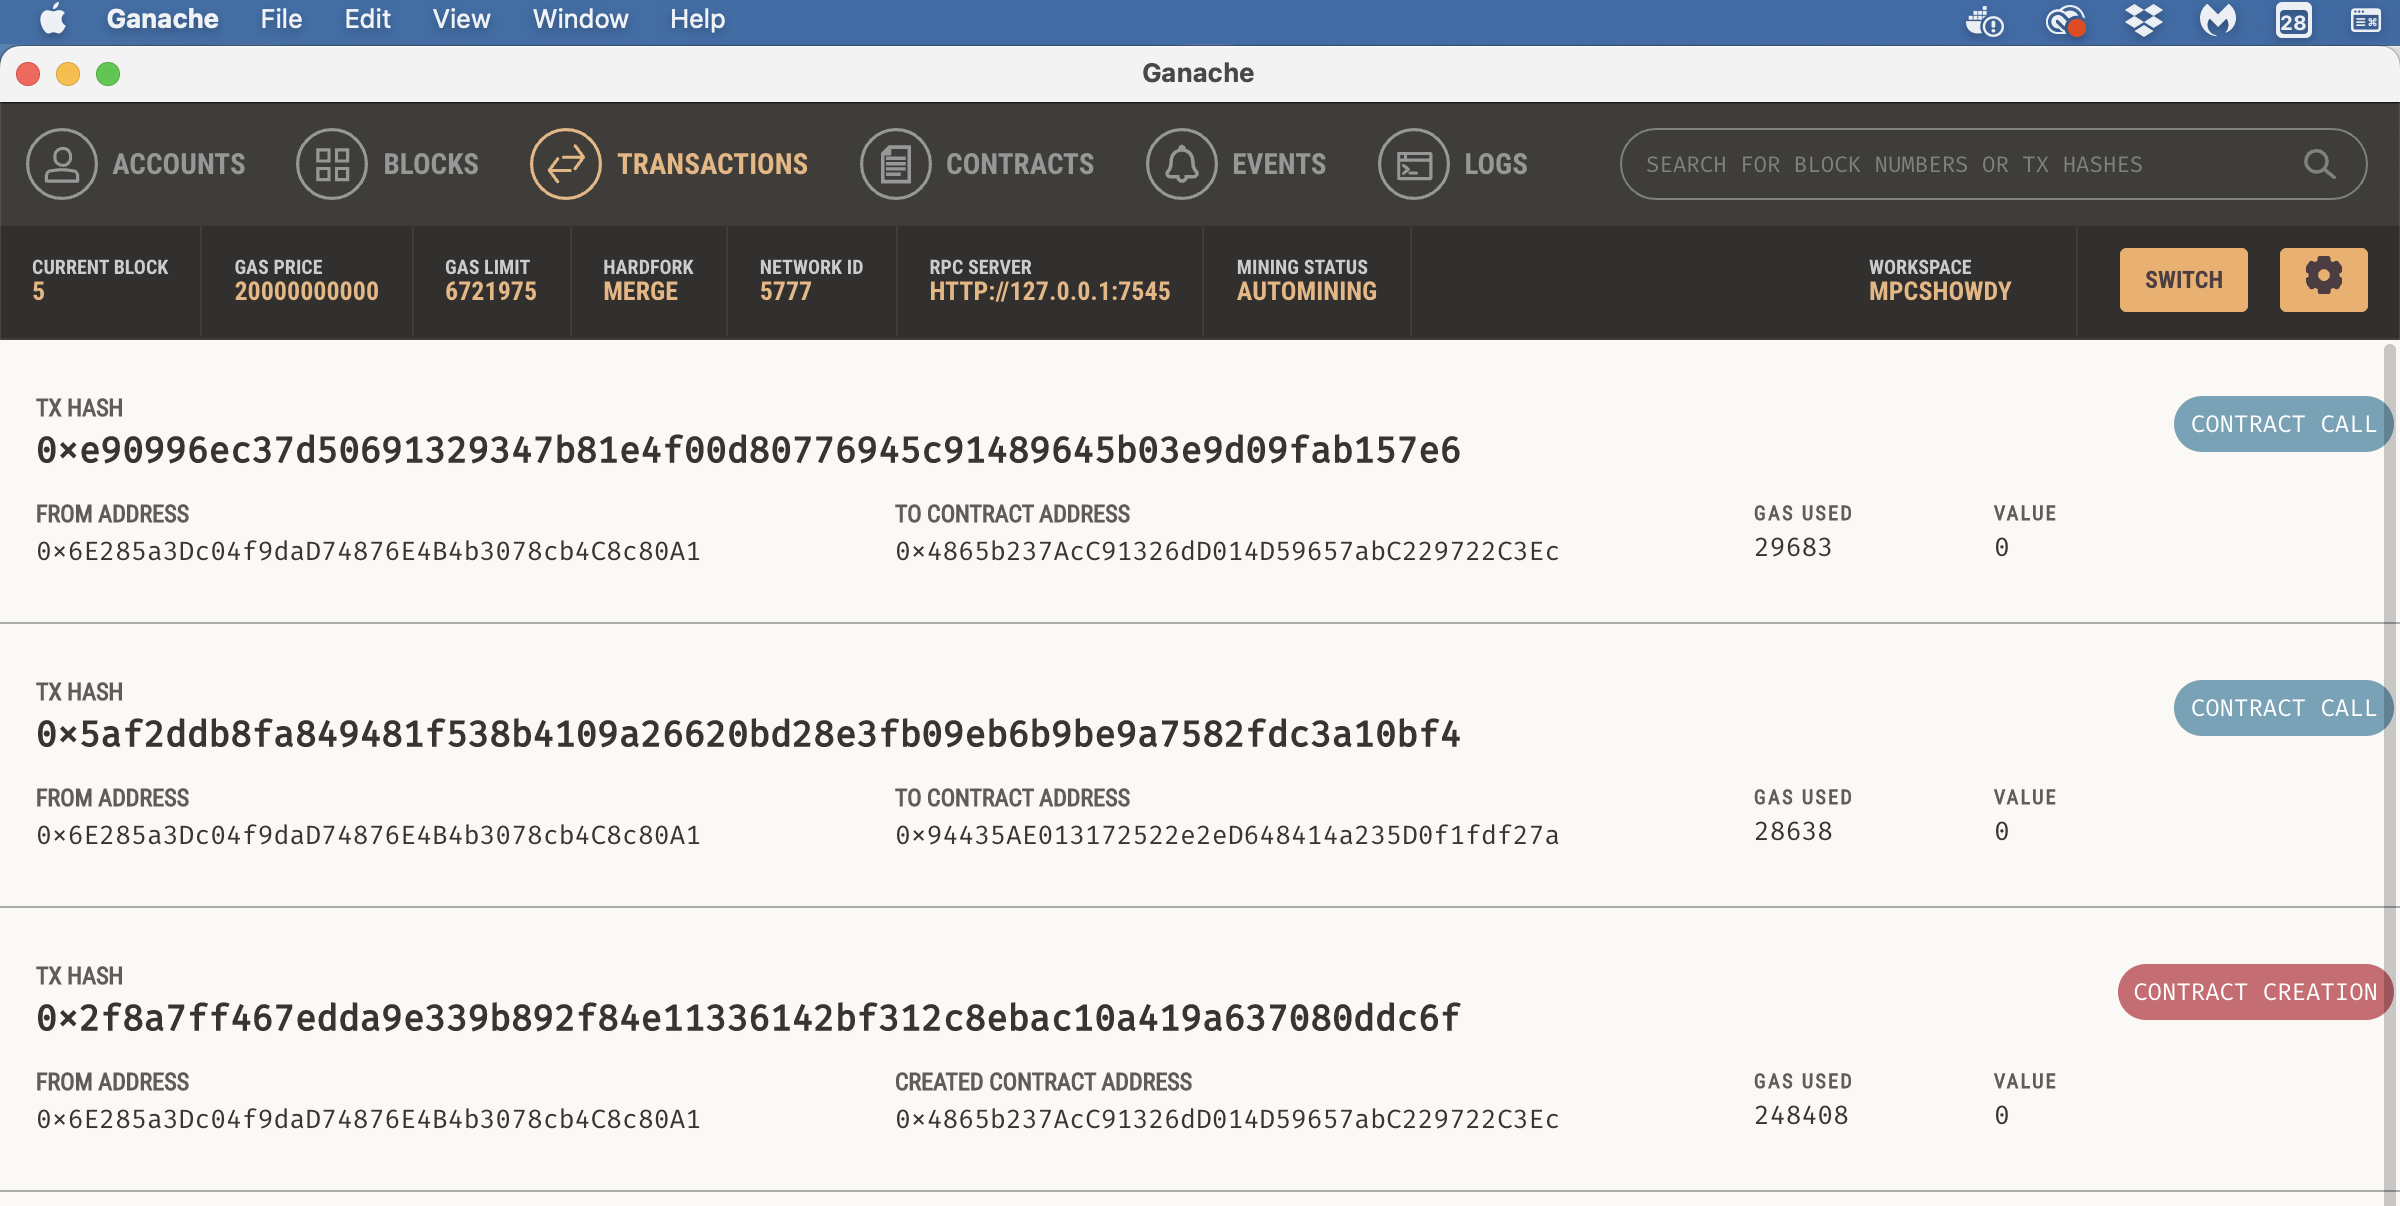
Here you see that we successfully created the contract and we
called it twice (your window may look different depending on
mistakes and re-runs, etc.). Speaking of which, click on
Blocks in your Ganache window and take a look at your blocks
created, and then click on Contracts to see your
contracts. You'll see that you don't have any truffle
projects linked (it's not done automatically):
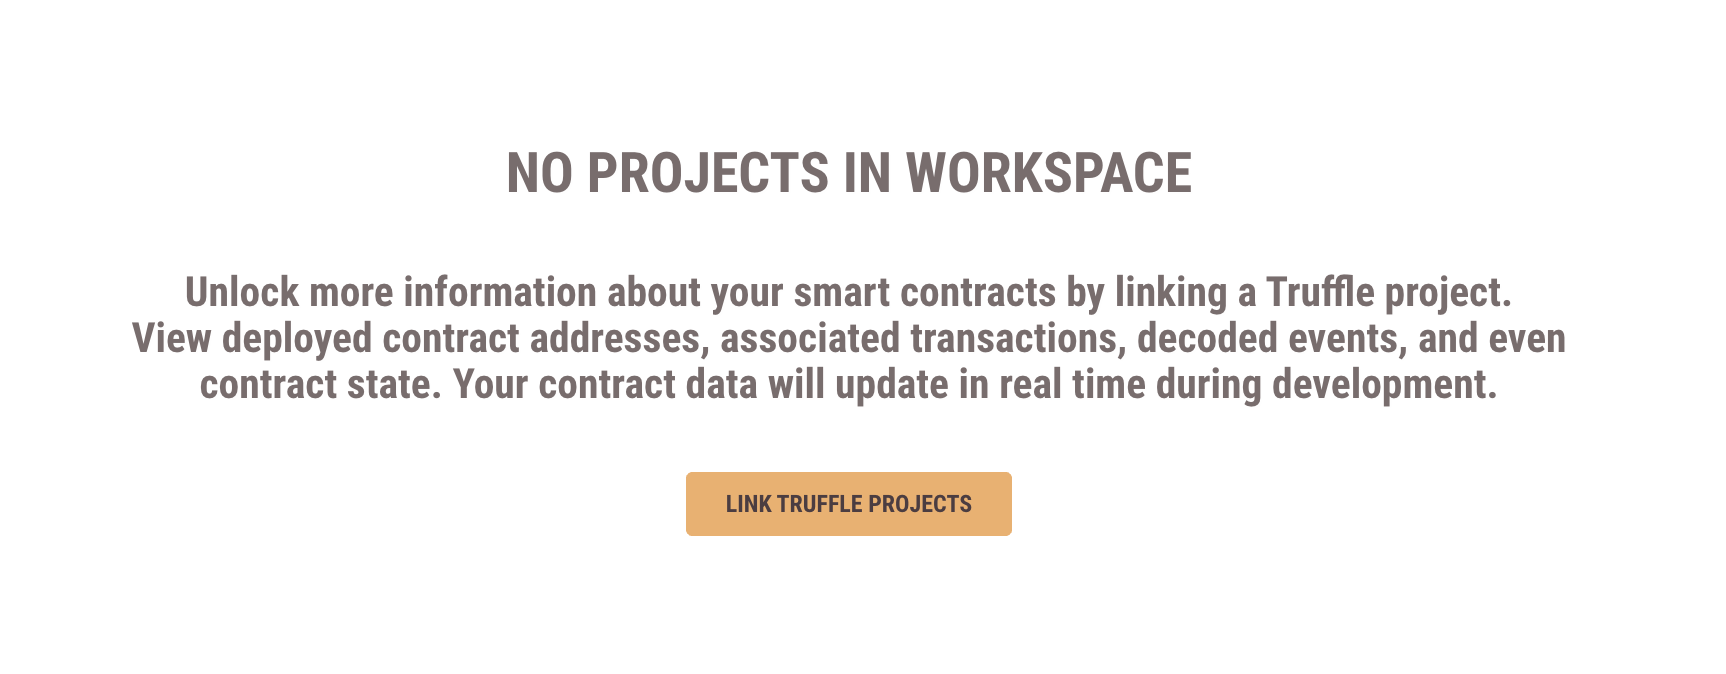
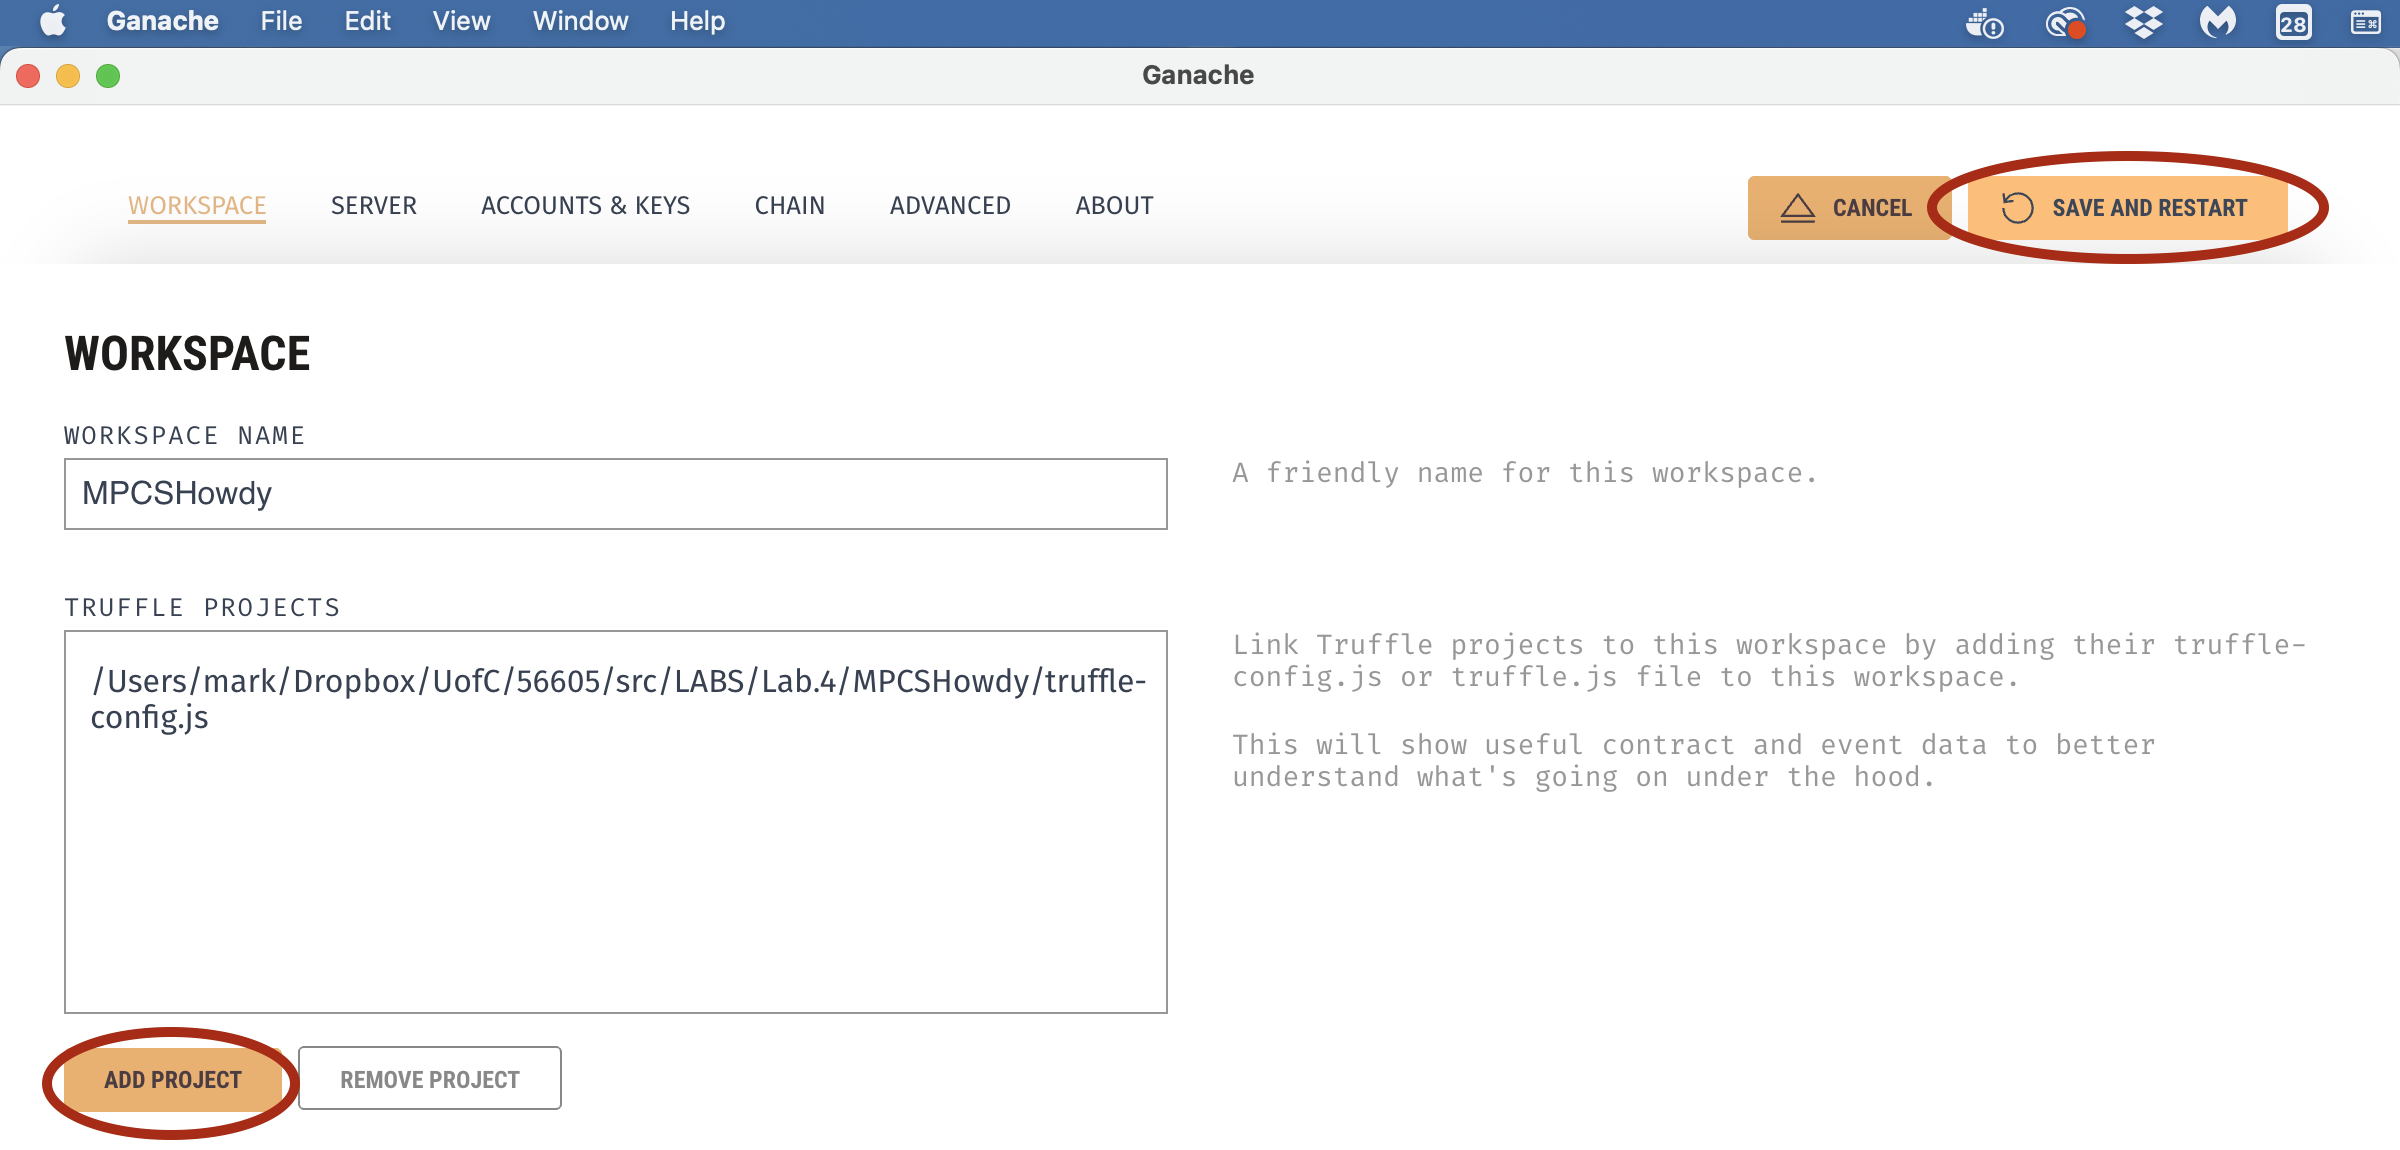
Well, let's link our VS code project. Click on LINK
TRUFFLE PROJECTS, click on Add Project at the bottom and
navigate to your VS code directory and click on the
truffle_config.js file and click on OK, then click on SAVE AND
RESTART:
Once you've linked your VS Code project to your Ganache
Workspace, you'll see this under Contracts (or something like
this):
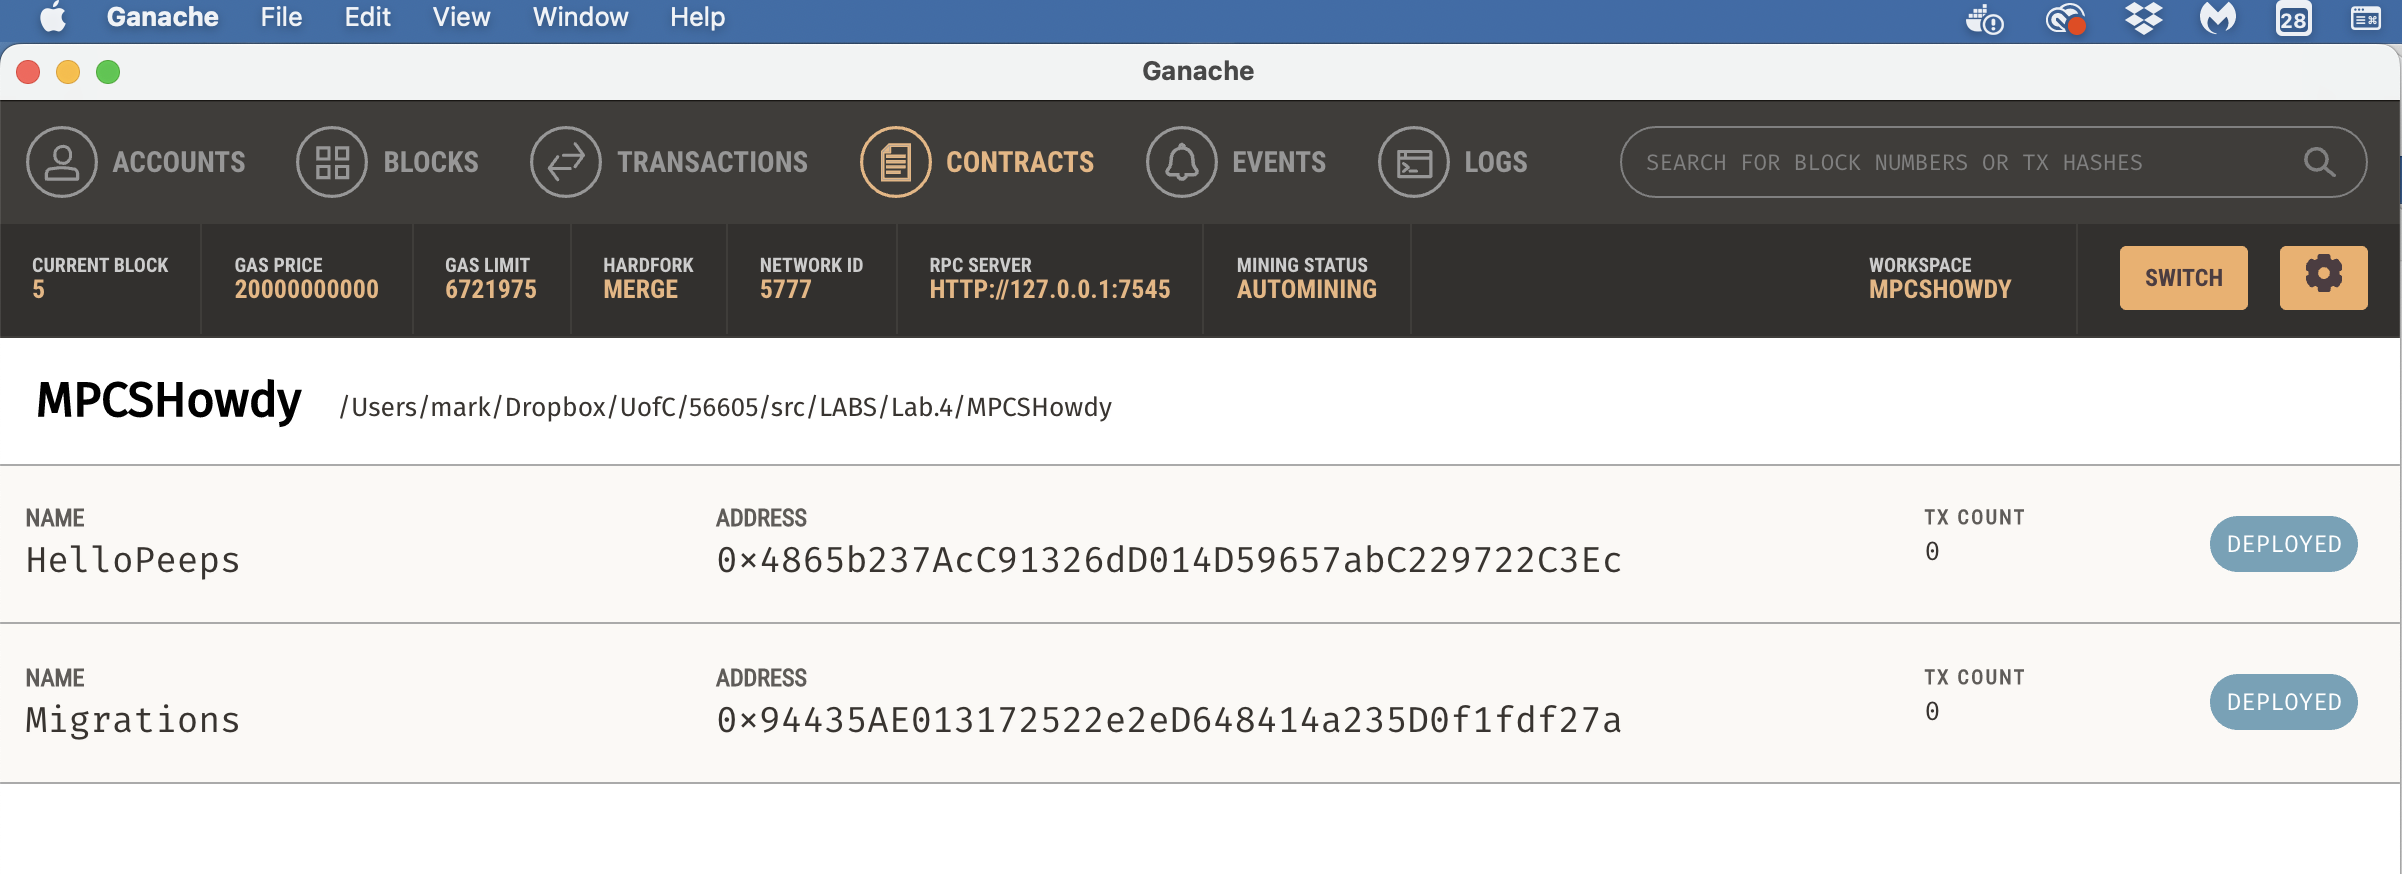
Here are your contracts, your Migrations.sol contract and your
HelloPeeps.sol contract, both deployed.
Now that we've compiled and migrated our contracts, we can
finally execute our code. At the prompt, type:
$ truffle console
You will enter the truffle development console and will see the
dev prompt:
truffle(development)>
Now let's execute our code (what
you type is in bold blue):
truffle(development)> HelloPeeps.deployed().then(function(instance)
{helloPeeps = instance;})
undefined
truffle(development)> helloPeeps.hello()
'Hello MPCS 56605 Peeps!'
If, upon calling the hello() function on your helloPeeps contract
variable, you see the output "Hello MPCS 56605 Peeps!",
congratulate yourself. You've just deployed and run your
first ethereum contract. It's Miller Time.
STEP 13:
Now, with such tremendous success under out
belts, let's call our second function, setGreeting(). Call
set greeting with your name (change "Mark" below to your name):
truffle(development)> helloPeeps.setGreeting("Mark")
{
tx:
'0x7c3b03fd715eee82e08c3ef53c864fc5500a048ab5734f4e14e9f14e68526656',
receipt: {
transactionHash:
'0x7c3b03fd715eee82e08c3ef53c864fc5500a048ab5734f4e14e9f14e68526656',
transactionIndex: 0,
blockHash:
'0xc6402355c591f0187d0a50f5aceeca40850fa8acb1b4dbf9dd243c528db8c021',
blockNumber: 35,
from:
'0x68a658da2120b1191e8e26a002abb2fa88543ac5',
to:
'0x72ad0e1211c5051d0a1ac9240bd9141a71bcf4be',
gasUsed: 29083,
cumulativeGasUsed: 29083,
contractAddress: null,
logs: [],
status: true,
logsBloom:
'0x00000000000000000000000000000000000000000000000000000000000000000000000000000000000000000000000000000000000000000000000000000000000000000000000000000000000000000000000000000000000000000000000000000000000000000000000000000000000000000000000000000000000000000000000000000000000000000000000000000000000000000000000000000000000000000000000000000000000000000000000000000000000000000000000000000000000000000000000000000000000000000000000000000000000000000000000000000000000000000000000000000000000000000000000000000000',
rawLogs: []
},
logs: []
}
Now, let's call our hello() function
again:
truffle(development)> helloPeeps.hello()
'Mark'
This works just fine. Notice
that calling setGreeting() caused a new transaction to happen
and used some gas, 29083 to be exact. We will cover in
class what all this means, like transaction and block hashes,
from and to accounts, bloom filters, etc.
Congratulations, you've now built your first Ethereum
contract. Now it's time to do a little more work on your own
blockchain.
Problem
2: Blockchain laboratory (continued):
BACKGROUND:
Now
it is time to begin to build your own blockchain. From
scratch. Needless to say, our intention here is not to
replicate Bitcoin Core. That might be a bit much.
Over the remaining labs, you will build a simple blockchain that
implements a simple cryptocurrency that can be mined and
distributed across nodes. You will generally find the
References section below helpful in addition to the required and
recommended reading.
WHAT YOU NEED TO DO:
STEP 1:
You are to produce the following UML description in
code using a programming language of your choice. For those
using non- or quasi-object-oriented-languages, use some alternate
form of a class, whatever makes the most sense, for instance, a
structure or other such data type that makes the most sense to
you. For those of you using an object-oriented-capable
language (such as python, ruby, C++, Java, C#, etc.), you are to
use classes.
The UML for the blockchain you are to build is this:
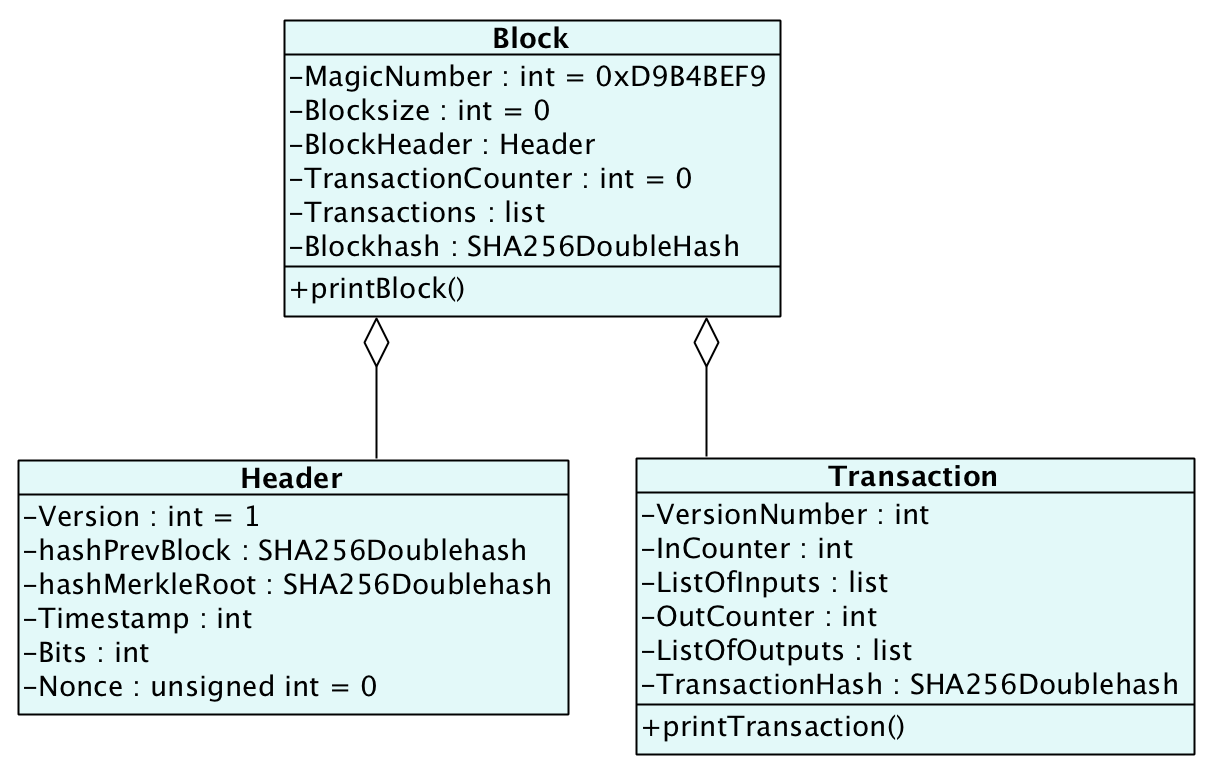
When we specify types in the above, these are indicators.
What that means is that you are to come as close as you can to
that datatype in the language that you are using. For those
using strongly-typed languages (C++, Java, etc.), this will be
trivial. For those using late-binding languages (python,
ruby, etc.), just do your best. You will not be downgraded
because a data is not of the correct "type". In the above,
if you see a default type specified (such as "int" for 0xD9B4BEF9
for the MagicNumber in the Block class), you are expected to
implement that default at the time of class instantiation.
For further elucidation as to the meanings of the above, see the
bitcoinwiki pages in the References section below.
Specifics:
The Header's hashPrevBlock is a double-SHA256 hash of the previous
block's header (serialized/stringified as necessary and
concatenated). You do not need to worry about big-endian or
little-endian issues with your blockchain. Simply use
whatever comes most natural to you. We are not looking for a
precise algorithm to do this. Just do it and be consistent
for your own sake. The minimum set of specific fields you
are to concatenate (and hash) from the header are:
TimeStamp + hashMerkleRoot + Bits + Nonce + previousHash.
These fields will represent a Block's Blockhash. If you find
that your implementation would benefit from hashing additional
information, such as an index or count, etc., that is entirely up
to you. You are free to add to the above UML model as your
implementation evolves. You do not need to ask permission to
add attributes (data fields) or methods or functions. The
Block's Blockhash is a hash of the current block's header.
What this means is that in our simplified case, a block holds a
hash of it's own Header information, and it's header holds a hash
of the previous block's hash, and so on.
For the Transactions ListOfIntputs, any list object or list-like
data structure will be fine, including a map or a dictionary; this
is all up to you. The actual inputs and outputs can
be a string for the moment (i.e., making the ListOfIntputs a list
of strings). The Transaction's TransactionHash is a hash of
the concatenated (serialized/stringified) fields of VersionNumber,
InCounter, ListOfInputs, OutCounter, and ListOfOutputs. We
will leave it to you to decide some means of
serializing/stringifying your ListOfInputs and ListOfOutputs
(which again, can be lists of simple strings). You may wish
to implement the Block's Transactions list as a map or dictionary,
where each key is the actual Transaction's TransactionHash.
For the hashMerkleRoot in the Header, you are to create a Merkle
Tree and store its Merkle Root hash in this field. You may
actually store the transactions internally in the Block as a
Merkle Tree (is in Block's Transactions list), what data structure
you actually use to construct your tree is entirely up to
you. We've simply designated it as a "list". That is
not meant to be prescriptive. You may re-use your Merkle
Tree work from Lab 4 here. Even if it's not a list.
The character and form and parameters of constructors, methods,
etc., are entirely up to you. You will notice that we have
only specified data elements in the above UML model. You are
granted carte blanche to design and implement your
blockchain as you see fit, as long as these core requirements are
met.
Finally, you will notice that we have not specified a particular
class called a Blockchain! This is intentional. You
may design your Blockchain class or structure as you see fit, as
long as it stores blocks (in memory only) that are
cryptographically linked and the blocks themselves contain
Transactions as specified above (Transaction inputs and outputs do
not need to be linked or associated at this time). For
example, you may implement your blockchain as a list or other data
structure, such a stack or a queue, in memory. There are no
requirements that your blockchain be persisted on disk.
If you have no immediate need for a given element (for instance, a
Block's Nonce or Bits values), you can simply leave them with a
default value for the time being. Again, default values
should be set at the time of object instantiation.
You are free to implement the printing of block data and
transaction data (via printBlock() and printTransaction()) as you
see fit. This may imply a less anonymous
blockchain where plain data is printed (i.e., from input strings
and output strings) or you may encrypt these strings and print out
the hashes (thus creating a more anonymous
blockchain). This again, is up to you. You might find
it simply easier to leave the data in plaintext in this first
version to make debugging a little easier.
Other than the above requirements, there are a few other general
requirements:
Function 1. There must be some means of asking your
Blockchain for a given block by block height and by block
hash. It is up to you how to implement this.
Function 2. There must be some means of searching the
Blockchain for a given Transaction by TransactionHash, which
should return the Transaction being searched. It is up to
you how to implement this.
Everything else should be self-explanatory, including the meaning
of the indicator "SHA256Doublehash". You should know what
that means by now.
Most importantly: Anything not specifically
spelled out as a requirement above may be interpreted and
implemented as you wish. You can think of this as
creative license.
STEP 2:
You are to write a test case (can be a simple main
function or an actual test harness from a framework) in which you
manually (read: hard-code) instantiate 10 new transactions,
where each transaction has one input and one output (can be
anything you wish at the moment). You will create a new
Blockchain and by doing so you will create your genesis block.
When instantiating the
Blockchain, you are to create a Genesis Block which will have
the hashPrevBlock hash set to all 0's. You can set the
genesis block's Transaction Input and Output strings to be
anything you wish. You may set the genesis block's
Transaction Output string to be anything you wish.
Basically understand that the genesis block and its transactions
are hard-coded.
You will manually add the first 5 transactions to a new
block that you instantiate at height number 1. Block 0 will
be your genesis block. You are to create a third
block which will be at height number 2, and you will add the
remaining 5 transactions to that third block.
After building your blockchain, you are to use Function 1
above to find and return a block by height and then print that
block. You are then to use Function 2 to find and return a
transaction from the blockchain (searching by transaction id hash)
and print out that transaction. Again, you may implement
these two functions any way you see fit.
Submit all code and related files (if any) as specified below.
Finally, and importantly, there are many implementations of
"simple block chains" around the internet. Feel free to look
at any of them. But remember, your submission had best not closely
resemble any of them in such a way that it would indicate direct
copying.
References:
You
may
find the following references helpful (in addition to the links
from previous labs):
Learning
Bitcoin from the Command Line
The Bitcoinwiki
Page on Transactions
The Bitcoinwiki
Page on Raw Transactions
The Bitcoinwiki Page
on Blocks
Submitting:
Each
assignment will have an invitation to create a Github
repository. You will use the lab[1-7]-YOUR_GITHUB_USERID to
submit your homework.